Videos are a powerful tool for engaging visitors and conveying information effectively. With GravityView, a feature-rich plugin that enhances Gravity Forms, you can transform your WordPress website into a captivating video gallery.
Whether you want to showcase product demos, portfolio projects, client testimonials, or informative tutorials, GravityView provides the functionality and flexibility to create stunning apps that include embedded video players.
In this step-by-step guide, we will walk you through the process of capturing videos using Gravity Forms and displaying them using GravityView. This will enable you to build a video gallery that suits your needs and create a memorable video browsing experience!
Sneak peek
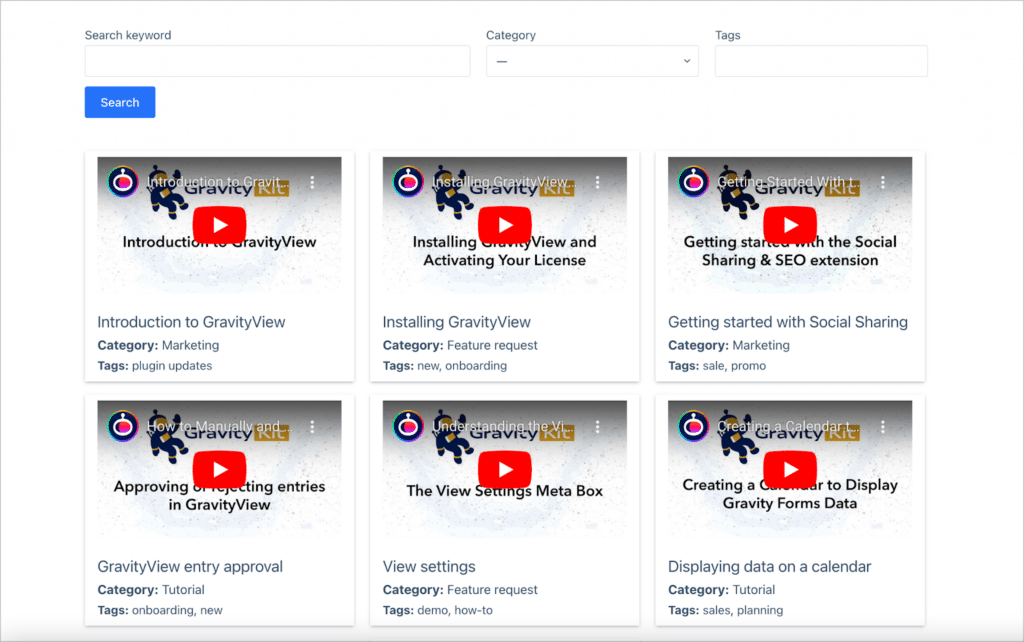
Here’s what our finished video gallery looks like:
What you’ll need
Here are the plugins you will need to build a video gallery like the one in this tutorial:
- Gravity Forms (any license level)
- GravityView (any license level)
Powerful reasons to add video content to your website
One study estimates that as many as 91% of consumers want to see more online video content from brands! If that isn’t reason enough to start creating more video content, here are some other compelling reasons why every website should include video content:
- Visual engagement: Videos are a highly engaging form of content that can captivate and retain visitors’ attention. By showcasing videos in a gallery format, you provide an immersive experience that encourages users to explore and interact with your content!
- Showcasing products or services: Video galleries offer a dynamic and compelling way to present products or services. You can demonstrate features, provide tutorials, or share customer testimonials, giving potential customers a deeper understanding of what you offer.
- Improved user experience: Organizing videos in a gallery format makes it easy for visitors to browse and find the content they’re interested in. By categorizing videos, adding descriptions, and enabling search functionality, you enhance the user experience and ensure they can quickly access the information they need.
- Increased conversion rates: Engaging videos have the power to influence purchasing decisions. By incorporating videos into your website, you can showcase your products or services in a visually appealing manner, which can lead to higher conversion rates and sales.
- SEO benefits: Videos are often more likely to be shared and linked to, further boosting your website’s visibility.
Why use GravityView? Why not just embed YouTube videos?
WordPress includes embed support for a range of video platforms, such as YouTube, Vimeo and DailyMotion. While it is simple to embed video players from these sites, this is a more manual solution that doesn’t give you a lot of flexibility.
Using a video gallery plugin also has limitations. However, using Gravity Forms and GravityView gives you the ability to tap into other powerful functionality that you won’t get with a specialized WordPress video gallery plugin.
For example, GravityView allows you to add embedded videos to portfolios, people profiles, directory listings, testimonials, or any web app you want to build!
Steps for displaying videos using GravityView
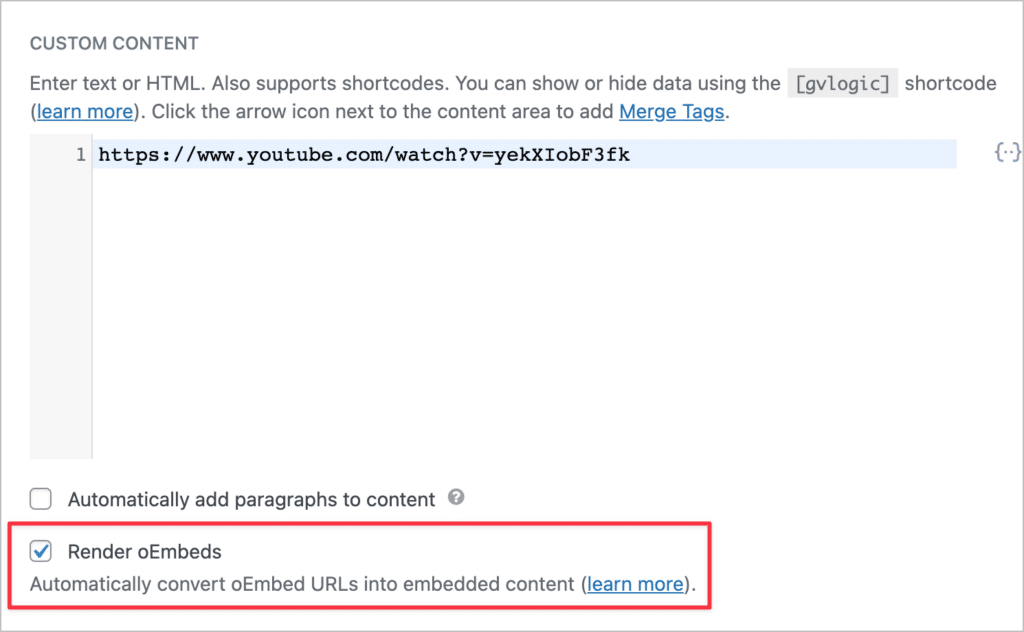
GravityView’s “Custom Content” field has an option for enabling oEmbeds, allowing you to turn regular links into embedded video players! You may be wondering whether videos have to all come from a specific platform. The answer is no—several video platforms are supported, including:
- Dailymotion
- Flickr
- YouTube
- Vimeo
- WordPress TV
In this tutorial, we’re going to be working specifically with videos hosted on YouTube. YouTube’s embed code can be tricky to work with sometimes, so we’re going to use a different method for embedding video players.
This involves us having to use a small HTML and CSS snippet to ensure videos maintain the correct aspect ratio and respond to different screen sizes. The good news is that we only need to add this code snippet once, and then GravityView will apply it to all the videos we add.
We’ll show you exactly where to add this snippet and how it works later in the tutorial.
Creating the video upload form
The first step is to create the video submission form. To create a new form in Gravity Forms, hover over “Forms” and click “New Form”. Now give your form a name and click “Create Form”.
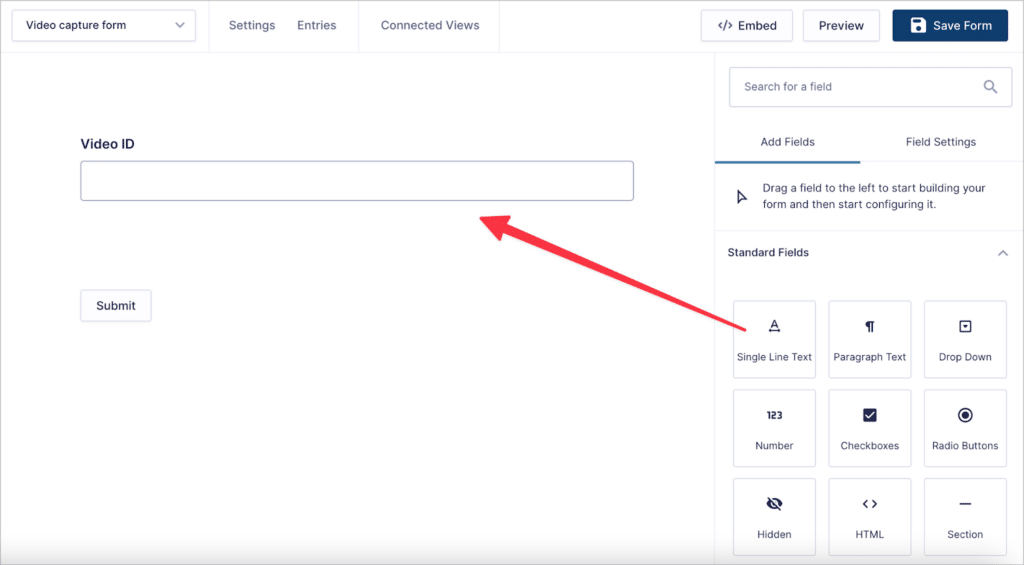
Now you can start building your video submission form using Gravity Forms’ drag and drop builder! The most important field to add is a “Single Line Text” field for capturing video IDs. Other than that, feel free to add any relevant fields you feel are necessary.
Okay, so what is a video ID? It’s basically the end part of the YouTube video URL made up of random letters and numbers. It comes after ?v= in the URL.

Capturing videos using the ID instead of the full URL will give us more flexibility when it comes to embedding the actual players on the front end. Okay, let’s carry on with building our form. For this example, we’ll keep things simple by adding the following four fields:
- Video title (Single Line Text field)
- Video ID (Single Line Text field)
- Category (Drop Down field)
- Tags (Single Line Text field)
When we create the View, we’ll make the “Category” and “Tags” fields searchable, so users can easily find relevant videos that they’re interested in watching!
Adding videos
To submit new video entries, all we need to do is copy and paste the video ID into the “Video ID” field, add the video title, select the category, and add some tags.

After clicking “Submit”, the information will be saved in the Gravity Forms backend. In the next step, we’ll build a View to display embedded videos on the front end.
Let’s move on to the next step—creating a View to display embedded videos on the front end.
Building the video gallery View
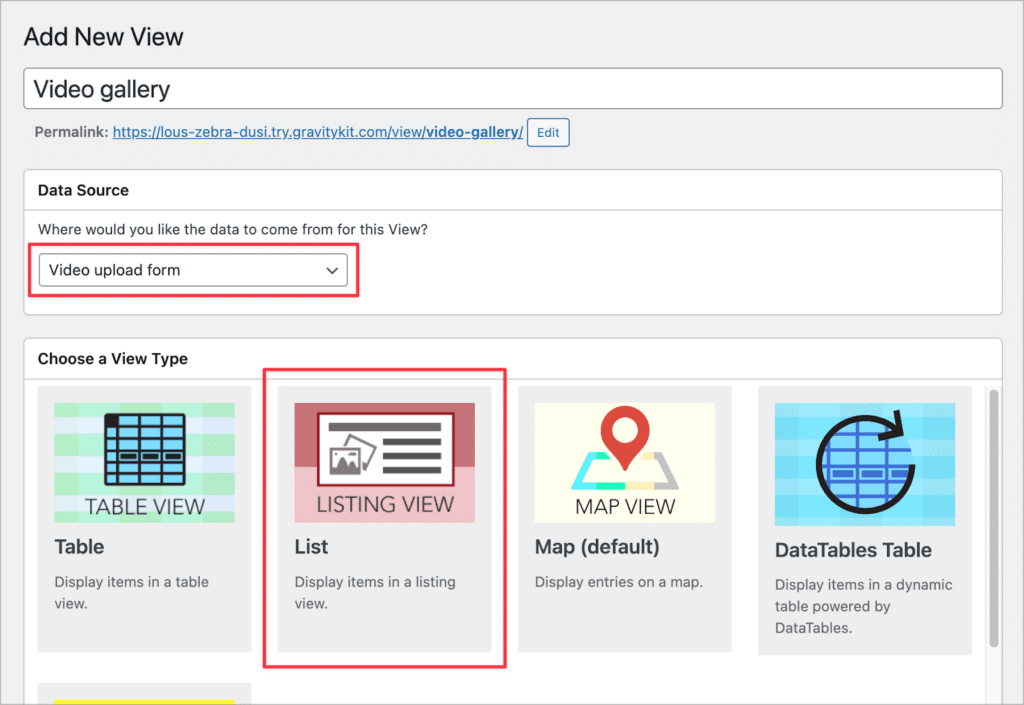
To create a new View, we’ll hover over “GravityKit and click “New View”. After giving our View a name, we’ll need to select a data source: This is the form with the entries we want to display on the front end.
We’ll go ahead and select the “Video upload” form as our data source. The next step is to choose a View Type. GravityView supports a range of View Types, allowing us to display data using different layouts.
For this example, we’ll select the “List” type.
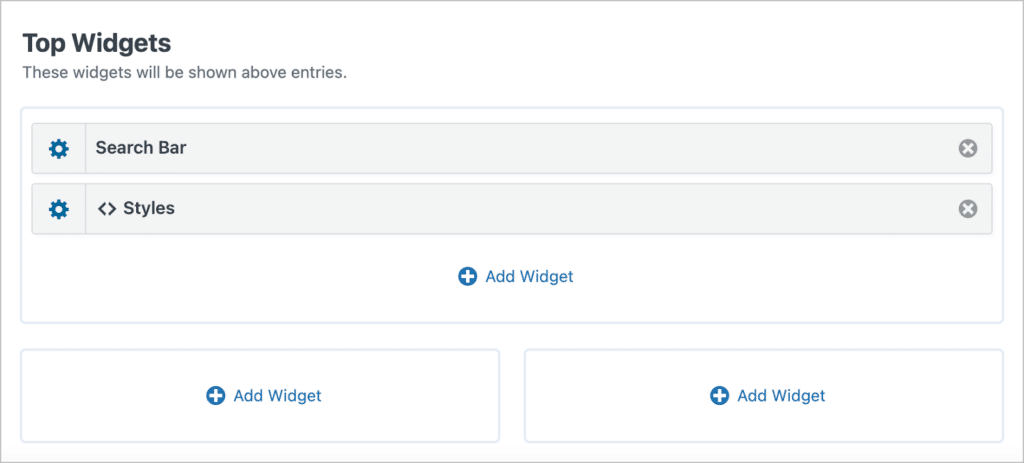
Now we can start constructing our View using GravityView’s drag-and-drop editor! The first thing we’ll need to do is add some styles to change the default layout from a list style layout to a grid style layout.
Here is the code we need to add to achieve that:
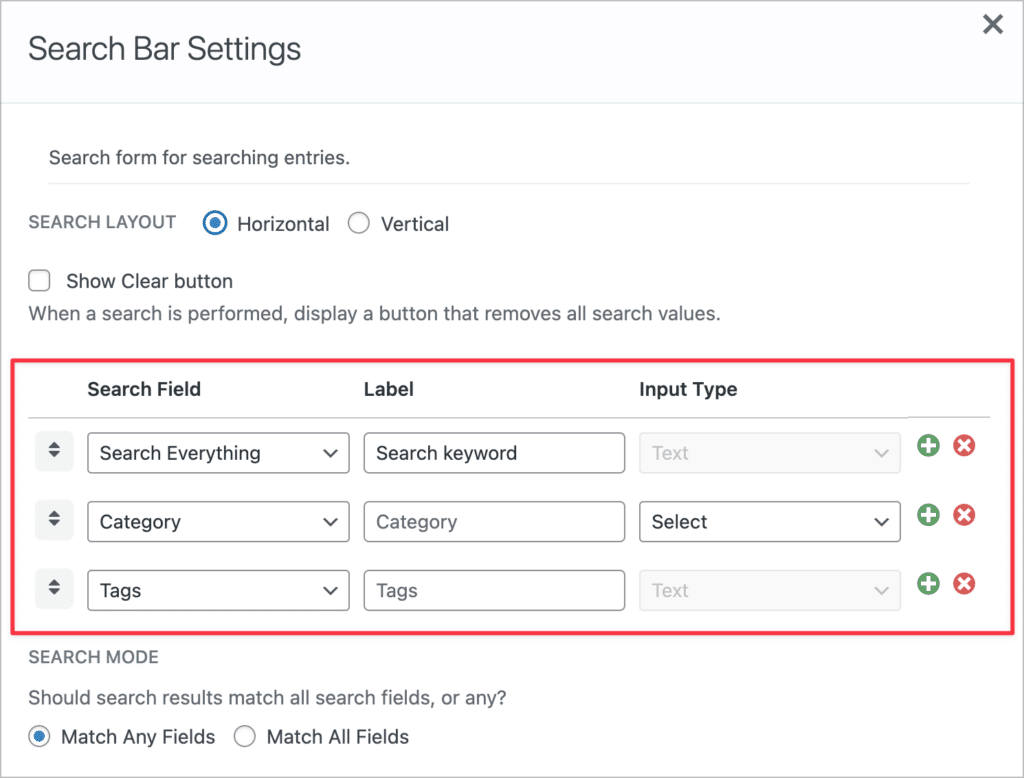
Next, let’s add a Search Bar widget, allowing users to search for videos in the gallery.
We can configure the search settings to ensure that both the “Category” and “Tags” fields are searchable. We can also add another search input for general keywords.
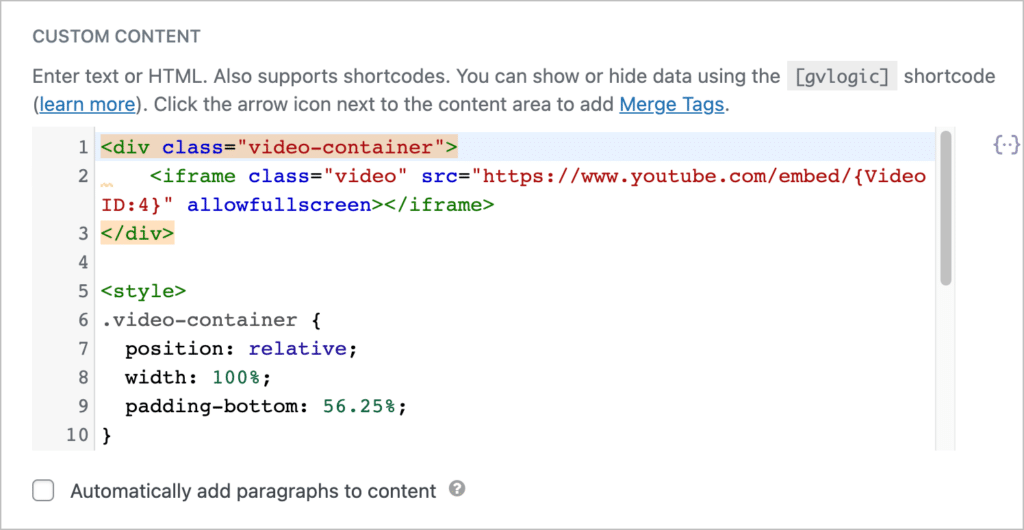
The next step is to add the embedded videos players along with the category and tags fields.
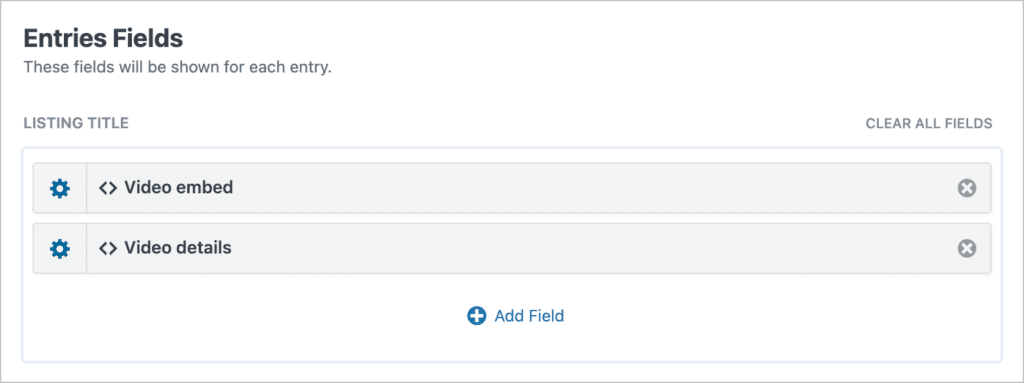
This is where we’re going to use the code snippet above. We’ll add it inside a Custom Content field. If you copy/paste this snippet, remember to replace the {Video ID:4} merge tag with your own! The {Video ID:4} merge tag will dynamically add the video ID to the YouTube embed URL.
Okay, that’s it! Let’s check out our View on the front end:

This simple View works well as a responsive video gallery, where we have full control over the layout, data, and search capabilities!
GravityView advanced features and options
In this tutorial, we kept things fairly simple, but the truth is that GravityView supports several powerful features that you can use to bolster your Gravity Forms applications. These include:
- A drag-and-drop View builder
- The ability to display data using different, preset layouts
- Entry approval
- Conditional logic
- Advanced filtering
- And many more features added by GravityView’s 7 premium extensions!
Other powerful GravityView use cases
GravityView is a powerful Gravity Forms add-on that functions as a “framework”, allowing you to build different kinds of web application for different use-cases! Here are some other popular examples of apps you can build using GravityView:
Create a video gallery on your WordPress site
In conclusion, creating a WordPress video gallery using GravityView opens up a world of possibilities for showcasing your multimedia content in a visually appealing and organized manner.
By harnessing the power of GravityView’s intuitive interface and flexible customization options, you can effortlessly create a stunning video gallery that captivates your audience.
Whether you’re a blogger, a content creator, or a business owner, this powerful combination empowers you to enhance your website’s visual appeal and engage your visitors on a whole new level.
So what are you waiting for? Get your own, free demo site and try GravityView for free today!

Helpful tips right in your inbox.
Subscribe to our biweekly newsletter for tips, special offers, and more!
Helpful tips right in your inbox.
Subscribe to our biweekly newsletter for tips, special offers, and more!