
Are you looking for a way to display Tweets on your WordPress website? Well, GravityView makes it easy to embed third-party links on your pages or posts!
Twitter has over 350 million active users! People all over the world use Twitter on a daily basis to catch up on industry developments, communicate with friends, and advertise their businesses. Adding Tweets to your site makes your website more interactive and can help you drive engagement on your content and social channels.
With GravityView, Not only can you embed videos, songs, podcasts, and Reddit links but you can also embed social media posts. In this post, we’re going to show you how to use Gravity Forms to collect Tweets and then display them on the front end using GravityView.
Why Display Tweets on WordPress?
GravityView allows you to display Gravity Forms entries on your site, including links to social media posts (like Tweets!). This opens up some nifty possibilities when it comes to building custom web apps or widgets.
Personal Profiles
Are you using GravityView to power your membership site by displaying user profiles on the front end?
Giving users the ability to embed individual tweets on their profiles adds an interactive element to the page and allows users to promote their Twitter accounts, get more likes, and boost their follower counts.
Creating a Twitter Feed on Your Site
By placing a View in your sidebar you can create a custom Twitter feed widget, showcasing all your favorite Tweets. This is perfect for blog posts or other content areas!
Reviews and Testimonials
Getting high-quality testimonials is important for the success of any business, whether you’re selling physical products or a monthly subscription. The problem is that users often use social media to send testimonials and these can go unnoticed.
Why not harness those great Tweets that your business receives by displaying them on your website for all to see? This is perfect for pricing pages, product landing pages, or even dedicated testimonial pages.
Collecting Twitter Links With Gravity Forms
In this example, we’ll show you how to use GravityView to build a testimonial feed by displaying user Tweets on a dedicated page on your site. First, you need to create a form in Gravity Forms to collect Twitter links.
To do this, log in to your WordPress website, hover over Forms, and click Add New. Next, give your form a name, something like “Twitter Links”.
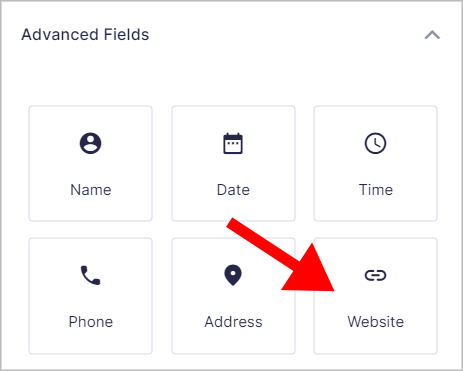
To capture Twitter links, add a Website field to our form called “Link to Tweet”. The reason we’re using a Website field and not a Single Link Text field is that Gravity Forms validates Website fields to ensure that URLs aren’t broken.
You’ll find the “Website” field under the “Advanced Fields” tab on the right of the form editor.
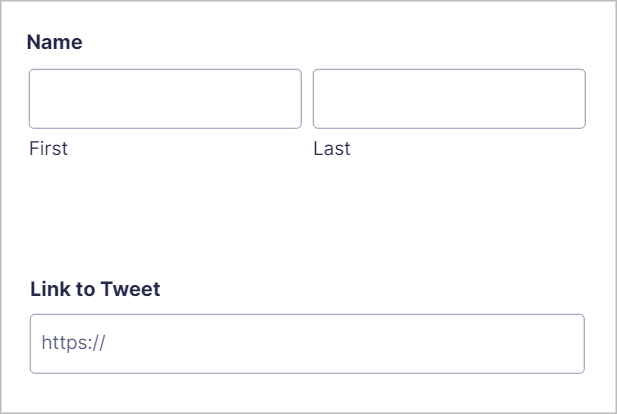
For this example, we’ll keep things simple by adding a Website field and a Name field. But feel free to add any other fields you feel are necessary!
The next step is to embed your form on a page or post.
Embedding Your Form
If you’re using the WordPress block editor (Gutenberg), you can add your form to a page or post using the Gravity Forms block. Alternatively, you can embed it using the [gravityforms] shortcode.
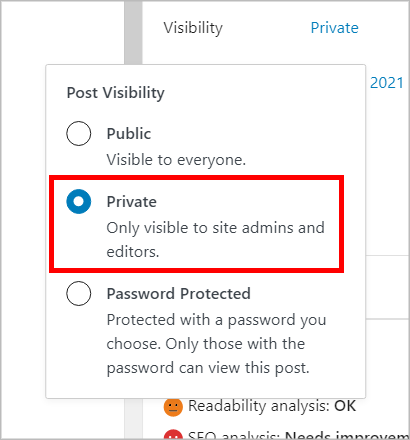
In our case, we don’t want this form to be visible to the public, because we want to choose which Tweets to embed. So to ensure our form remains hidden to regular users, we’ll change the visibility of the page where the form is embedded to “Private”.
To do this, open the Post Visibility settings and select “Private”. This will ensure that only site admins and editors can access the page.
Now that your form is set up, you can start building a View to display Tweets on the front end.
Using GravityView to Display Tweets in WordPress
Creating a View to display Tweets on the front end is super easy, just follow the three steps below.
1. Create the View
If your website isn’t running GravityView, you’ll need to first install the plugin. After activating GravityView, hover over Views and click New View.
Next, give your View a name and select the form you just created as the Data Source. Now, under “Choose a View Type” select “List”.
Now you can start building your View using the GravityView drag and drop field editor.
In order to take advantage of GravityView’s auto-embed capabilities, you’ll need to add the “Link to Tweet” field inside a Custom Content field. To do this, click on the + Add Field button under “Listing Title” and select Custom Content.
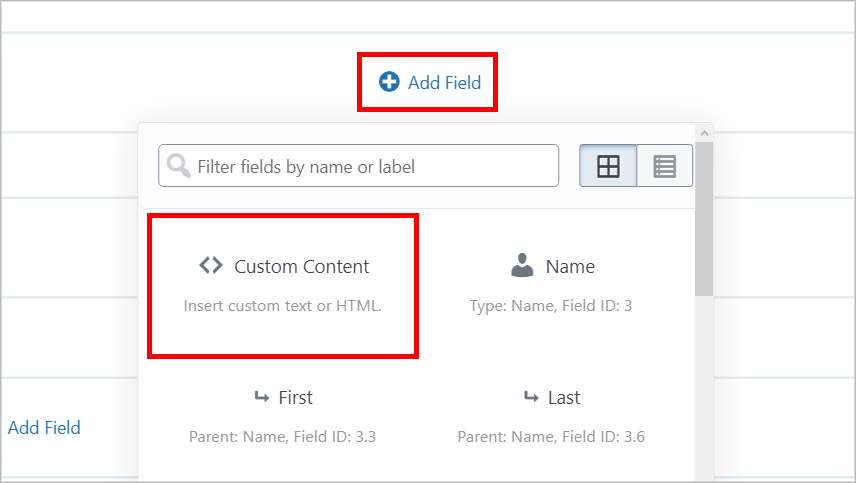
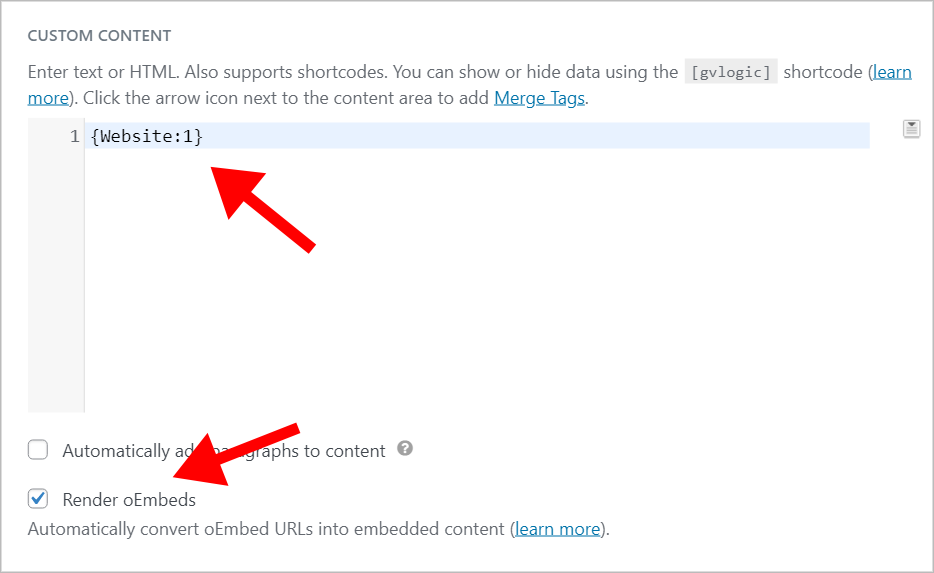
Next, add the “Link to Tweet” field merge tag inside the Custom Content text editor. You can do this by clicking on the button to the right and selecting the correct merge tag.
Now comes the most important part – underneath the text editor find the option that says “Enable oEmbeds” and ensure it’s checked.
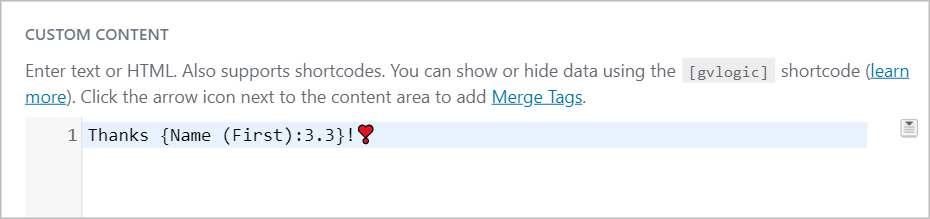
In this example, we’ll add a second Custom Content field, with a thank you message for the user. Custom Content fields accept HTML, merge tags, plain text, and other shortcodes, so feel free to get creative here!
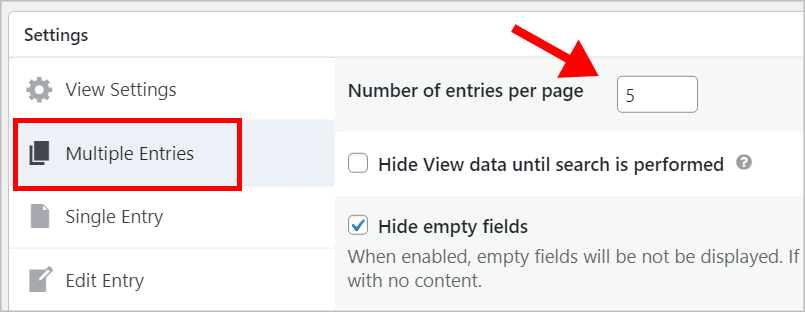
Finally, you may want to limit the number of Tweets shown on your Testimonial page. You can do this by modifying the View Settings.
2. Tweak the View Settings
You’ll see the View Settings panel below the View editor. Here you can modify different aspects of your View including permissions, filtering settings, and more. To limit the number of Tweets shown on one page, click on the Multiple Entries tab and adjust the “Number of entries per page”. The default is 25 but we’ll change it to 5.
When you’re done, don’t forget to publish your View!
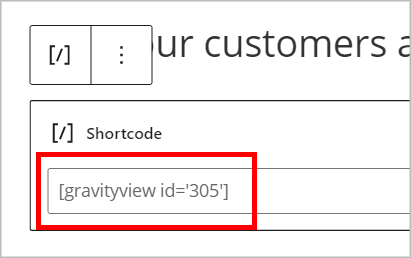
Lastly, embed your View on a post or page by using the embed shortcode. Simply copy the shortcode from the View editor page and paste it inside a Gutenberg Shortcode module.
Okay, it’s time to see what it looks like on the front end!
3. Test the View
To test out your new testimonial feed, you’ll need to submit your form with a few demo links. To get the URL for an individual Tweet, simply click on the up arrow at the bottom right of the Tweet and select “Copy link to Tweet”.

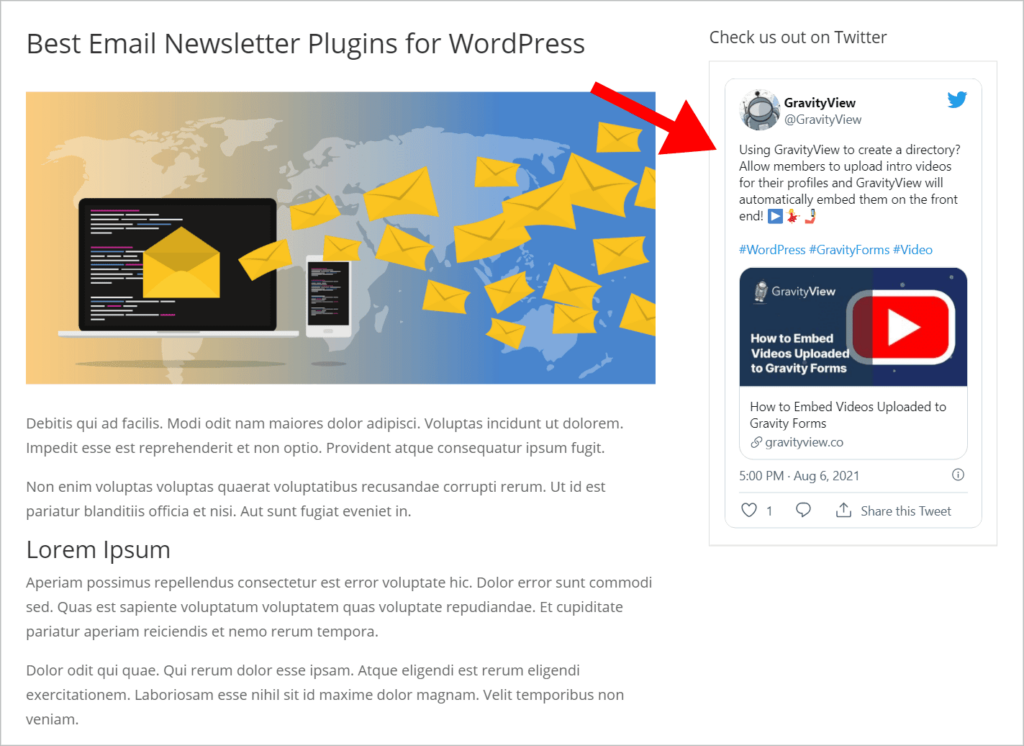
Here’s what our Twitter testimonial feed looks like on the front end.
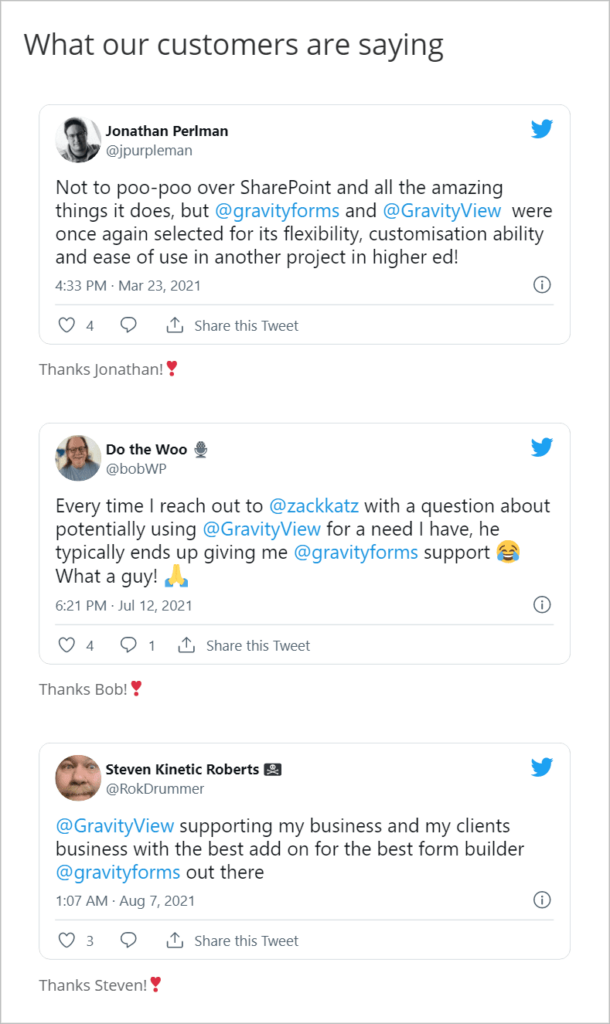
Pretty cool, right? 😎
WordPress: Display Tweets Using Gravity Forms
Twitter is a growing social media platform, popular among people in different industries. Using Gravity Forms and GravityView, you can embed individual tweets on your website using a variety of different layouts.
In this post, we showed you how to build a Twitter testimonial feed. Embedding Tweets makes your website more interactive and helps to drive engagement.
Using GravityView’s built-in oEmbed functionality, you can embed links from a variety of third-party platforms. To see what else you can build using GravityView, check out more of our tutorials!
Join Our Newsletter!📧🙌
✅ Helpful Gravity Forms content straight to your inbox
✅ Be the first to hear about new updates and releases