
So you need a way to export your Gravity Forms entries to Excel? There are several ways to do this depending on your website and what you’re trying to accomplish.
The easiest way is by using GravityExport. This plugin gives Gravity Forms users a simple and elegant way to export their data into Excel. The simple solution offered by GravityExport appeals to people who want to set up an export without having to configure anything else. And best of all, it’s free on WordPress.org!
In this post, we’re going to review all the different ways that you can export your data from Gravity Forms to Excel. This includes:
- Exporting entries directly to Excel using GravityExport
- Exporting data from Gravity Forms to CSV and converting to an Excel file
- Bonus: Exporting Gravity Forms entries to Excel from the front end
Ready? Let’s get started!
Can Gravity Forms export to Excel?
Gravity Forms does not allow you to export form entries directly to Excel (.xlsx). You can only export entries to a CSV file and then convert that to an Excel file (more on this later). If you want to export your Gravity Forms data directly to Excel, you’ll need to use a plugin called GravityExport.
1. Exporting data to Excel using GravityExport
GravityExport provides a straightforward way to export your Gravity Forms data to .xlsx format (the file format used by Microsoft Excel). Using GravityExport, you can create Excel reports without having to log in to your site or go through any manual steps. And it’s worth mentioning again that GravityExport Lite is free to download from WordPress.org!
To get started, log in to your WordPress dashboard and install GravityExport Lite by navigating to the “Plugins” page in the sidebar and clicking the “Add New” link. You can either search for the plugin by typing “GravityExport” into the search bar, or you can download the latest version from WordPress.org and upload it to your site directly.
💡 Pro tip: The full version of GravityExport is available on our website. It includes features such as multiple reports, Dropbox integration, PDF export, and more!
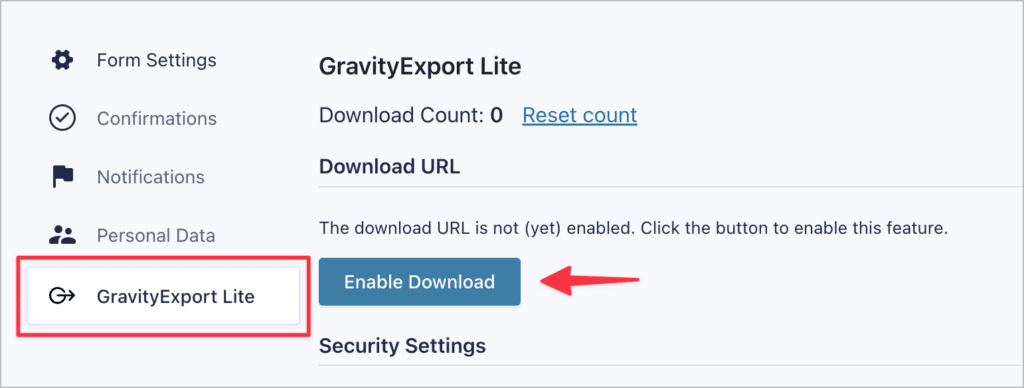
Next, click on “Forms”, find the form you want to export, hover over the “Settings” link, scroll down and click on “GravityExport Lite”. Next, click “Enable Download”.
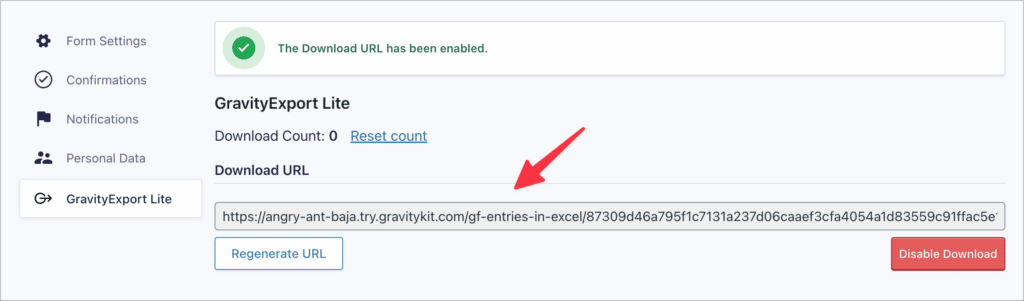
The plugin will now generate a unique download link. By pasting this link into your browser and hitting “Enter”, your Excel report will download automatically.
GravityExport Lite provides you with several options for customizing your report. You can edit download permissions, select a date range, change the filename and exclude unwanted fields.
GravityExport is perfect for those who want a simple way to set up an Excel export. After saving the feed, all you need to do is share the URL with those who need access to the data. As you receive new form entries, the Excel report will update automatically.
2. Exporting to CSV and converting to Excel
Gravity Forms gives you the ability to export all of your form entries as a CSV file, which you can then open in Excel for further analysis. Here’s how:
First, log in to your WordPress site, hover over “Forms”, and select “Import/Export”. Next, select the form with the entries you want to export and choose which fields you want to include. If you only want to export entries that contain specific values, you can do this by using conditional logic filters.

💡 Pro tip: You can set a date range to limit entries by submission date. If no date is set, all of your entries will be exported.
To download the export file, click on the button that says, “Download Export File”. Your entries will be exported to CSV format. CSV stands for “Comma Separated Values”. These files are often used for exchanging data between different applications.
You can easily open CSV files in Excel, but if you want to covert them to .xlsx format, you’ll need to import them as external data.
The drawback to exporting CSVs from Gravity Forms is that you’ll have to log in to the site and manually configure the export every time you need new data. It’s also important to note that logged-out users won’t be able to access the data!
Now let’s take a look at exporting entries to Excel from the front end using the GravityView plugin and the DataTables View Type.
3. Bonus: Exporting data to Excel from the front end using GravityView
GravityView is our flagship add-on for Gravity Forms that allows you to display your form data on pages or posts and create powerful web applications.
Another way to export your Gravity Forms data to Excel is by using the GravityView DataTables View, which comes as part of our Core + Extensions license.
DataTables gives you the ability to display your data in a powerful table that includes advanced filtering options. You can also export data in a variety of formats—including CSV, Excel (.xlsx), and PDF—directly from the front end.
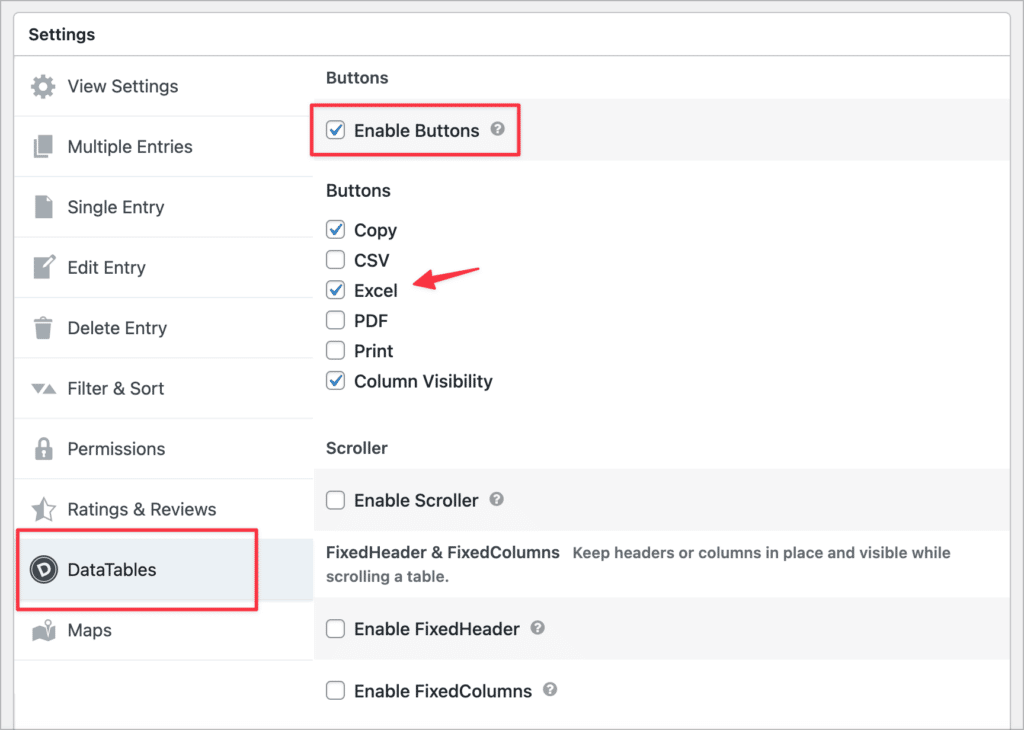
Start by creating a new View and select “DataTables Table” as your View type. Add the required fields to the View. Next, scroll down to the View settings, select “DataTables” and ensure that you check the box labeled “Excel” under where it says “Buttons”.
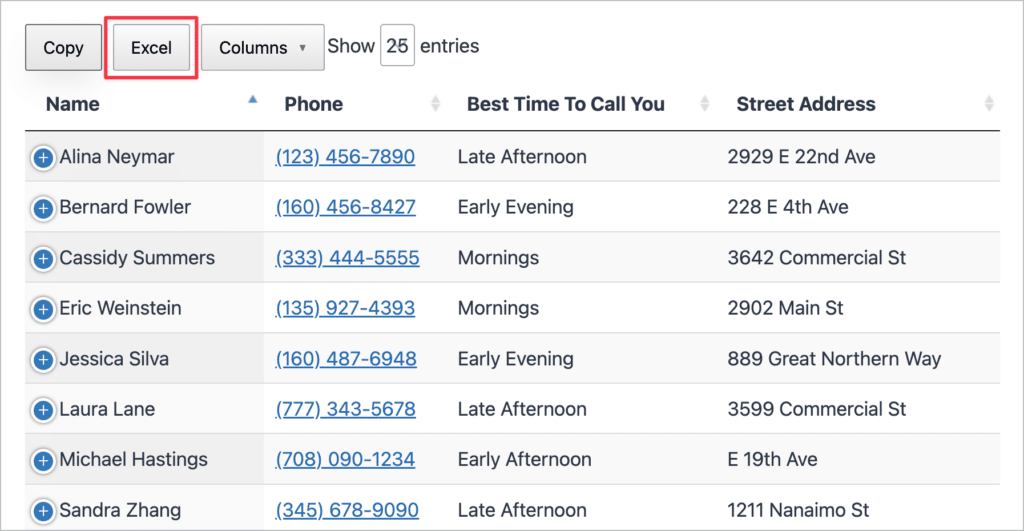
To export your data as an Excel (.xlsx) file, open your View on the front end and click on the button that says “Excel” above your DataTable.
Create Excel sheets from your Gravity Forms entries
As you can see, there are several ways to export data from Gravity Forms to Excel. The way that works best for you will depend on your needs and the setup of your website.
Exporting your form entries directly from Gravity Forms is simple enough, but this feature has limits when it comes to customization and user permissions.
If you need more control over who has access to what data, or you’re planning to export data on a regular basis, you’re better off using GravityExport.
If you’re in need of a complete solution for displaying, editing, importing, and exporting your Gravity Forms data, GravityView is your best choice!

Helpful tips right in your inbox.
Subscribe to our biweekly newsletter for tips, special offers, and more!
Helpful tips right in your inbox.
Subscribe to our biweekly newsletter for tips, special offers, and more!