
🚀
Gravity Forms is the most powerful form plugin for WordPress. Find out how to set up forms, configure feeds and extend Gravity Forms with powerful add-ons.
Estimated reading time: 19 minutes
From contact forms to billing forms to customer surveys and reviews, forms are more than a tool for collecting data. Forms are the way your business connects with your customers.
Gravity Forms is the most powerful and innovative form plugin for WordPress. Thousands of businesses use Gravity Forms to collect customer details, register website users, take payments, and much more.
In this guide, we’re going to walk you through how to get the most out of Gravity Forms for your blog or business, and the importance of web form accessibility. If you want to skip to a particular section, you can use the links below!
Table of contents
- What is Gravity Forms?
- Why Gravity Forms is the best WordPress form plugin
- Gravity Forms pricing
- How to install the Gravity Forms plugin
- Creating new forms in Gravity Forms
- Gravity Forms notifications
- Gravity Forms confirmations
- Form feeds connect Gravity Forms to the world!
- Embedding Gravity Forms on your website
- How to style forms in Gravity Forms
- What happens after clicking “Submit”?
- Gravity Forms merge tags
- Selling products with Gravity Forms
- Registering new users on your website with Gravity Forms
- Editing and updating your forms and entries
- How does Gravity Forms stack up against other form builders?
- What are the best add-ons and extensions for Gravity Forms?
- More helpful guides
- Getting started with Gravity Forms: final thoughts
What is Gravity Forms?
Gravity Forms is a WordPress plugin that allows you to build complex, accessible forms using an intuitive drag-and-drop builder. Gravity Forms is a premium (paid) plugin (there is no free version!).
Although Gravity Forms is branded as a form plugin, it’s so much more than that. Gravity Forms has integrations with some of the leading web applications and online service providers. This includes Hubspot, Mailchimp, Aweber, Slack, Zapier, PayPal, and more!
The Gravity Forms ecosystem is innovative and dynamic. Gravity Forms releases frequent updates and are well-known for their 5-star customer support.
There are also seven Gravity Forms certified developers (including GravityKit!) that build and maintain powerful add-ons, allowing you to create flexible, WordPress-powered web apps built on Gravity Forms.
Why Gravity Forms is the best WordPress form plugin
If you’re a WordPress user, you’ve probably come across a number of different form plugins. So, what makes Gravity Forms better than all the rest?
Gravity Forms is a leader in web form accessibility
Web accessibility is the process of creating websites that are easy to navigate and can be used by people with visual impairments or other disabilities.
Gravity Forms is the leader when it comes to web form accessibility. The release of Gravity Forms 2.5 included a range of accessibility improvements, allowing you to build forms that are WCAG compliant.
Some features of Gravity Forms that make it accessible include:
- Robust HTML5 markup
- Enhanced screen reader feedback for users with visual impairments
- The possibility of providing feedback on form errors
- Improved keyboard navigation
- Warnings about form accessibility issues
The CDC estimates that 26% of US adults have some form of disability, that’s around 60 million people! Optimizing your web form for accessibility can increase your user base, boost your SEO and improve the online experience for everyone.
Ease of use
Gravity Forms is optimized for ease of use. It comes with an intuitive drag and drop, visual form editor that allows you to build complex forms with only a few clicks.
The drag-and-drop form builder mimics the Gutenberg block editor, making it a pleasure to use. Field settings are neatly set out and conditional logic settings open up in a fly-out panel, providing plenty of space to manage complex rules.
The form editor also includes a search field that allows you to find fields that you need without having to scroll through all of the different options. You can also drag and drop fields into columns, without having to add CSS classes. This makes the form-building process easy and efficient.
Finally, setting up a new form is quicker than you may think. Just head over to the template library and choose from one of several Gravity Forms templates!
Gravity Forms is extensible and flexible
One of the most powerful aspects of Gravity Forms is its extensibility and flexibility. You can use Gravity Forms to create product order forms, event registration forms, build email opt-ins to grow your email list, and much more.
There is also a range of extensions available that allow Gravity Forms to integrate with other popular applications.
Third-party, certified Gravity Forms developers also offer add-ons that turn Gravity Forms into much more than a form plugin.
Displaying form submissions on the front end, exporting data to PDF, and performing advanced calculations on form entries are some of the things you can do using third-party plugins.
Gravity Forms can be used as the foundation for membership websites, online stores, employee databases, directories, business workflows, and more.
Gravity Forms’ features in a single word… “Impressive”
Another reason why Gravity Forms is the most powerful WordPress form plugin is that it ships with a host of impressive features.
When building forms, there is a wide variety of fields to choose from including basic input fields, and more advanced fields like the File Uploads field, Product field, Date field, and Time field.
Conditional logic is also built into Gravity Forms, allowing you to show or hide form fields based on user selections. This allows you to create personalized forms that collect relevant information.
Finally, Gravity Forms allows you to set up notifications that can work like autoresponders to keep you in the know every time a user submits one of your forms.
Simple spam prevention
One of the most annoying things to do deal with as a website owner is spam form submissions! Almost everyone has encountered this problem before. You create a new contact form on your site and within days you find your inbox flooded with spam messages.
With Gravity Forms, you won’t have to worry about spam submissions anymore! From enabling the sophisticated honeypot feature to installing a free add-on, there are several effective ways to prevent Gravity Forms spam.
Gravity Forms pricing
Gravity Forms offers a range of add-ons depending on which license you buy. There are three licensing options – Basic, Pro, and Elite. Let’s take a look at each one below.
Gravity Forms “Basic” license
The Basic license costs $59/year and gives you access to 15 add-ons allowing you to integrate Gravity Forms with popular third-party applications.
Here are some of the add-ons included in the Basic license:
- Hubspot
- Aweber
- Constant Contact
- Mailchimp
- ActiveCampaign
Gravity Forms “Pro” license
The Pro license includes everything in the Basic license and gives you access to an additional 18 add-ons. The Pro option costs $159/year.
Some of the add-ons included in the Pro license are:
- Dropbox
- Freshbooks
- Help Scout
- PayPal
- Stripe
Gravity Forms “Elite” license
The Gravity Forms Elite license includes everything in the first two tiers as well as an additional 13 add-ons. The Elite license costs $259/year.
Here are some of the add-ons included in the Elite option:
- User Registration
- Survey
- Polls
- Quiz
- Coupons
How to install the Gravity Forms plugin
Start by going to your Gravity Forms Account page and downloading the plugin ZIP file.
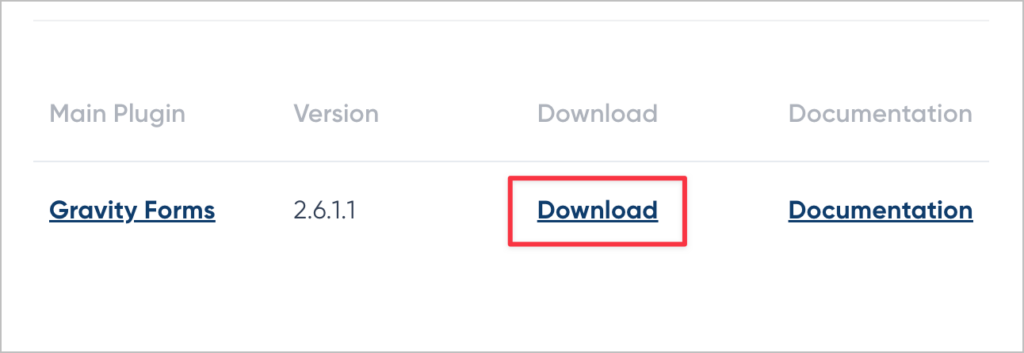
Next, log in to your WordPress admin dashboard, hover over “Plugins” on the left side navigation menu and click “Add New”. Now select “Upload Plugin” and then click on the “Choose File” button. Finally, locate the Gravity Forms plugin ZIP file, select it and click “Install Now”. Gravity Forms will now install automatically on your website!
When the installation has finished, click “Activate Plugin”. The final step is to activate your plugin license for access to updates and support.
Creating new forms in Gravity Forms
Let’s take a look at how to create new forms. This guide is titled “how to use Gravity Forms” after all.
To create a new form in Gravity Forms, hover over “Forms” in the left-hand menu and click “New Form”. You can now select a preset form from the template library (new in Gravity Forms 2.7), or build your own form from scratch by choosing the “Blank Form” option.

If you choose to build your own form, give your form a name (and an optional description) and click “Create Form”.

You can now start constructing your form using the Gravity Forms visual form editor!
Form field types
Gravity Forms supports over 30 form fields including dropdowns, checkboxes, file uploads, and much more. While most fields come with Gravity Forms core, some require you to install specific add-ons.
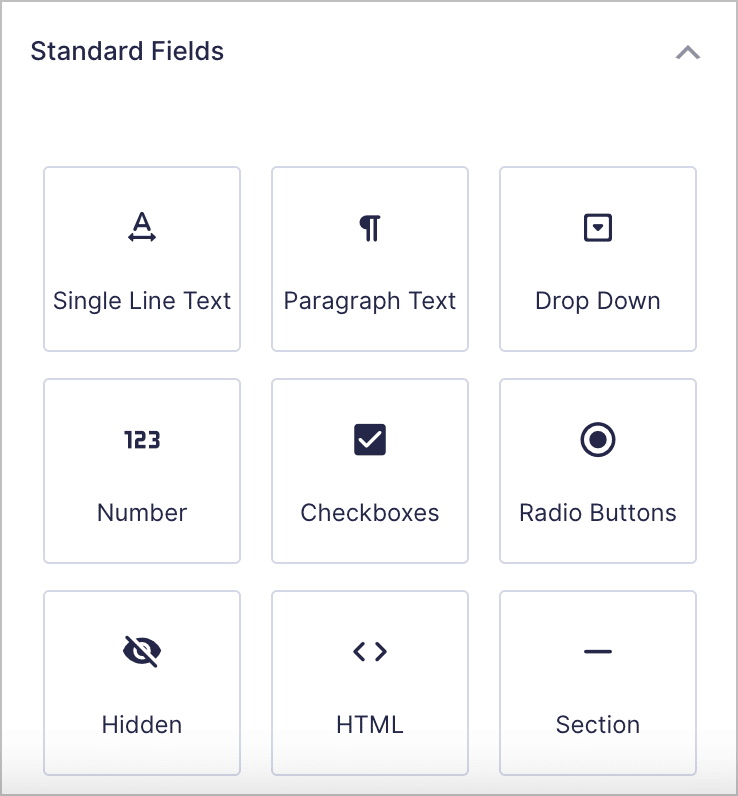
There are four categories of fields – “Standard”, “Advanced”, “Post”, and “Pricing”. Let’s take a look at each one below.
Gravity Forms Standard fields
Standard Fields include general form fields that you would expect to see in most forms on the internet. There are ten standard fields, they are:
- Single Line Text
- Paragraph Text
- Drop Down
- Number
- Checkboxes
- Radio Buttons
- Hidden
- HTML
- Section Break
- Page Break
Gravity Forms Advanced field types
Advanced fields are helpful for specific use cases and often contain multiple input fields within one container.
- Name
- Date
- Time
- Phone
- Address
- Website
- Username
- Password
- File Upload
- CAPTCHA
- List
- Multi Select
- Consent
- Chained Selects
- Quiz
- Survey
Gravity Forms Post fields
Using post fields you can turn form submissions into WordPress posts. Gravity Forms supports the following post fields:
- Post Title
- Post Body
- Post Excerpt
- Post Tags
- Post Category
- Post Image
- Post Custom Field
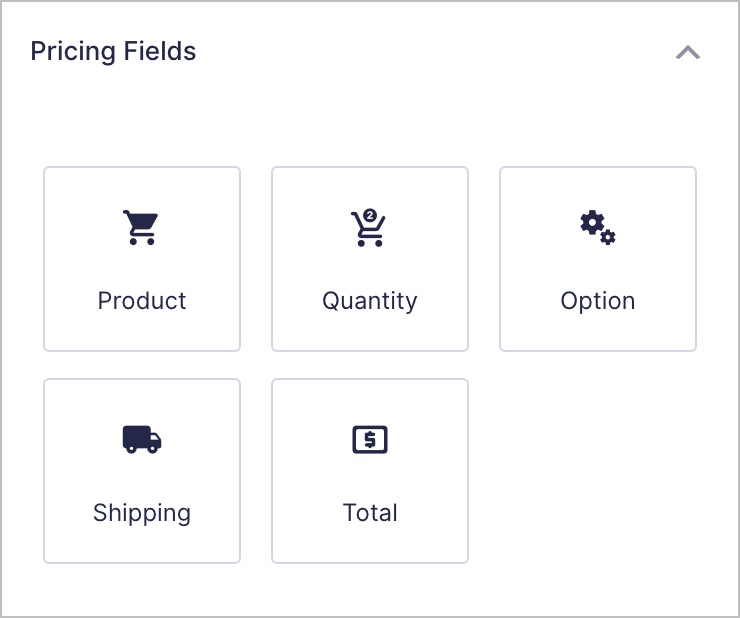
Accept payments with Gravity Forms Pricing fields
Pricing fields allow you to create product order forms. You can then use Gravity Forms Add-ons to integrate your forms with payment processors such as Stripe, PayPal, and more. Here are the different Pricing fields:
- Product
- Option
- Quantity
- Shipping
- Total
- 2Checkout card field
- Mollie card field
- Square card field
- Stripe card field
- Credit Card
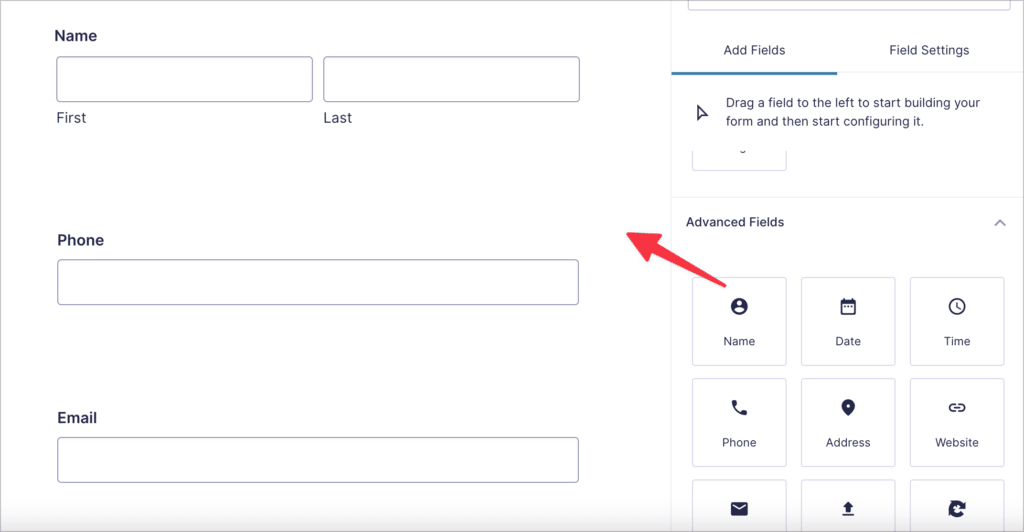
To add a field to your form, drag and drop it from the right-hand panel onto your form.
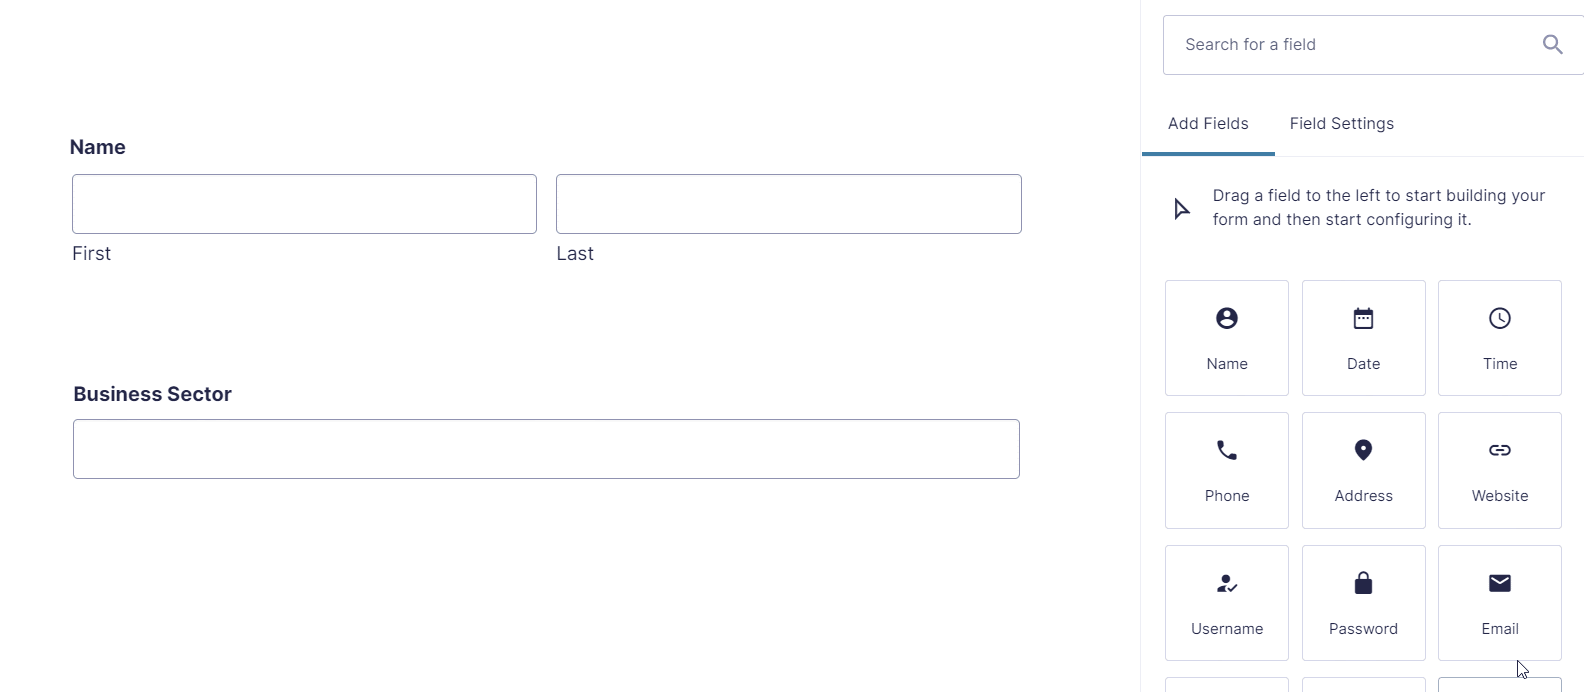
If you want to place fields adjacent to one another, instead of below one another (i.e. if you want to create multiple columns in your form), you can do so by dragging and dropping the field to the left or right of another field, like so:

Now that you know how to construct a new form using the different field types, you can start to customize your form by editing the field settings.
Modifying form field settings
Each field in Gravity Forms comes with its own set of options, allowing you to customize how it looks and functions on the front end.
To bring up the Field Settings, click on a field in your form, or hover over it, and click on the settings icon that appears on the left-hand side.

Under “Field Settings”, there are four groups of options – “General”, “Appearance”, “Advanced” and “Conditional Logic”.
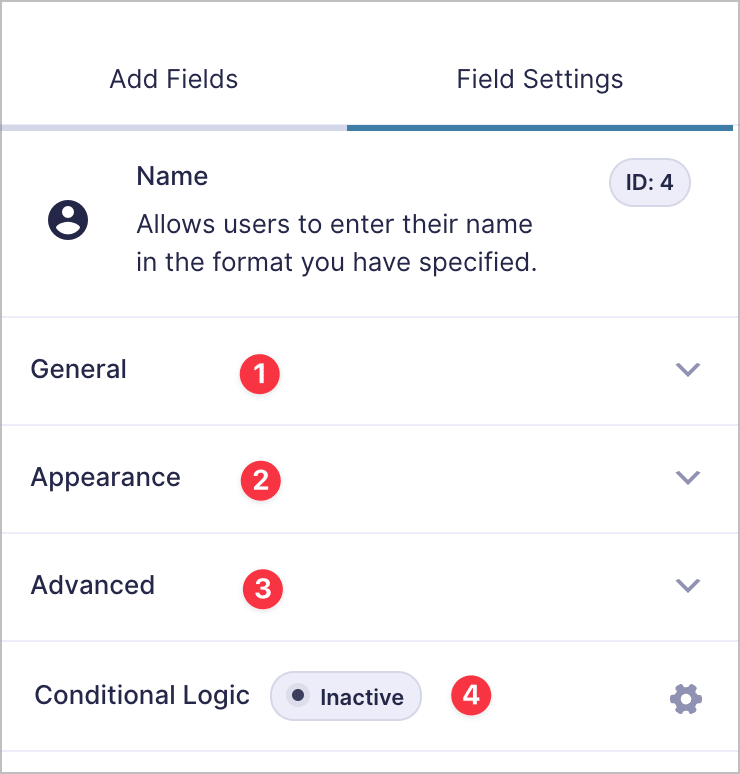
- Under “General”, you’ll find a range of basic options that allow you to change the label text, add a description, mark the field as required, and more.
- The “Appearance” tab is where you can alter the look of your fields on the front end. Here you can add placeholder text, add CSS classes and adjust field sizing.
- The “Advanced” tab allows you to change the field visibility settings, set default values, and add admin labels.
- And finally, “Conditional Logic” allows you to show or hide fields based on parameters that you set. Conditional Logic settings open in a separate fly-out menu, giving you enough room to create complex rules.
💡 Pro tip: To learn more about conditional logic in gravity Forms, read Gravity Forms Conditional Logic: The Ultimate Guide.
Building multi-page forms
As a user, it’s no fun staring at long, complicated forms. Multi-page forms improve the user experience by breaking up form fields into manageable sections.
You can create a multi-page form by inserting the “Page” field where you want one section to end and another to begin.
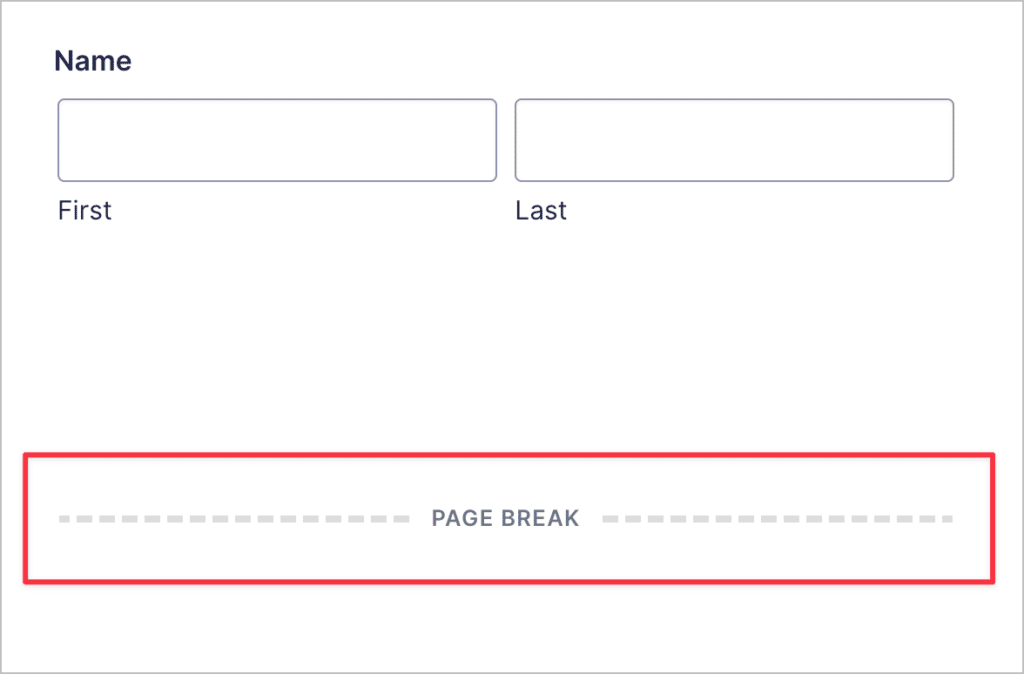
When a user is filling in a multi-page form, they will only see form fields for one page at a time. When they are finished filling in fields on the current page, they can click “next” to go to the next page.
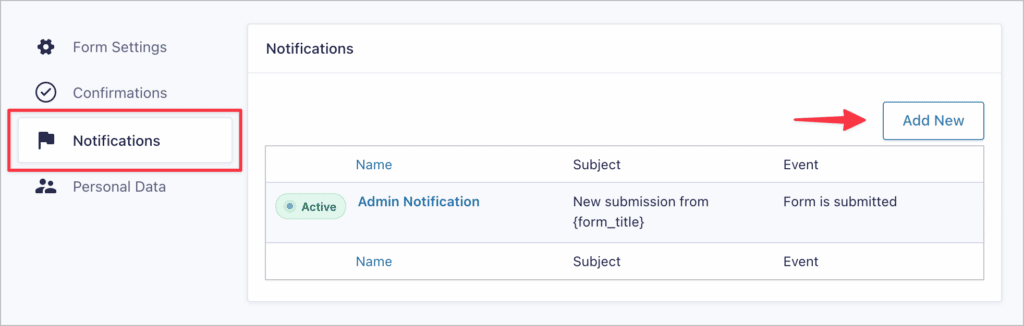
Gravity Forms notifications
Gravity Forms allows you to create email notifications that send to admins or users when you receive a new form submission.
You can create a new notification by going to the forms page, hovering over your form, and clicking on Settings. Next, click on Notifications in the left-hand menu and then Add New.
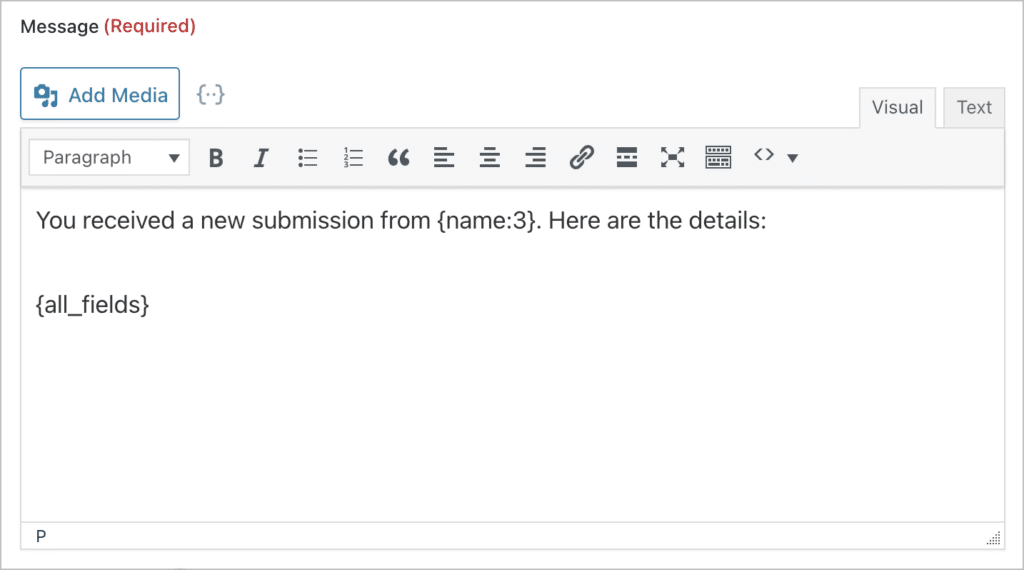
When creating a new notification, you can insert Gravity Forms merge tags in order to pull through information submitted by a user in their entry.
After configuring your notifications, you can create confirmations that allow you to control what the user sees after they submit your form.
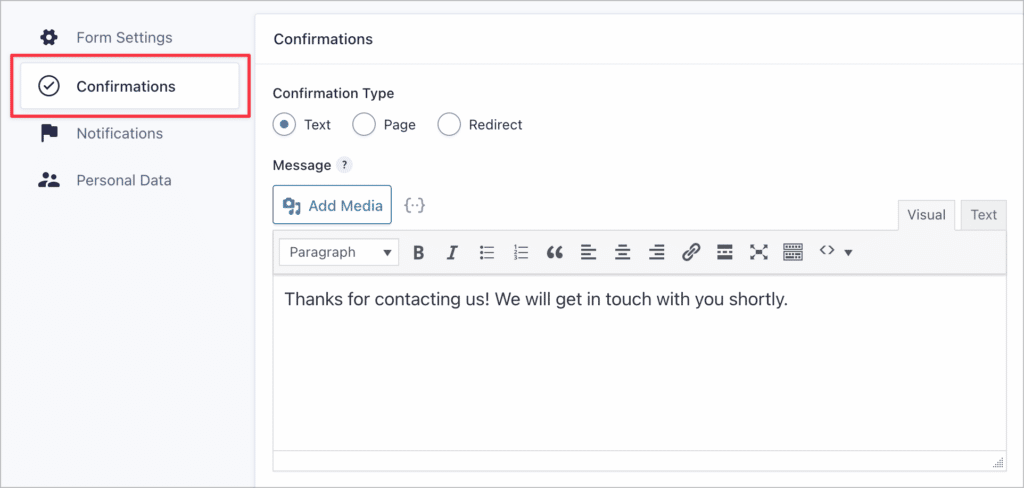
Gravity Forms confirmations
Gravity Forms confirmations allow you to display messages to users after they submit your form, send them to a page on your site, or redirect them to a custom URL.
You can also use conditional logic to display confirmations based on specific parameters. This allows you to target different users with different messages and personalize the user experience.
To create a new confirmation, hover over your form, hover over “Settings”, and click “Confirmations”.
💡 Pro tip: Read more about creating custom confirmation messages in Gravity Forms!
Form feeds connect Gravity Forms to the world!
Feeds allow you to send information between Gravity Forms and an external application or service each time a user submits your form.
While notifications send emails, feeds allow you to share information directly with external platforms such as customer management systems, email providers, or payment gateways.
When opening the form settings page, you’ll see feeds show up on the left.
For example, if you’re using the User Registration add-on, you’ll see a “User Registration” feed appear, allowing you to register new users when they submit your form.
Feeds allow you to:
- Process payments through third parties like PayPal or Stripe
- Send form information to CRM platforms like ActiveCampaign
- Initiate support requests through HelpScout
- Send files to external storage services like Dropbox
- And much more!
Now you know how to create and configure a new form in Gravity Forms! The next step is to display that form on a page or post.
Embedding Gravity Forms on your website
It’s easy to embed forms that you create inside WordPress pages or posts. Here are a collection of guides showing how to embed forms using different methods and form builders:
- Embed Gravity Forms using the WordPress block editor
- Embed Gravity Forms using a shortcode
- Embed Gravity Forms on pages or posts using Divi
- Embed Gravity Forms on pages or posts using Elementor
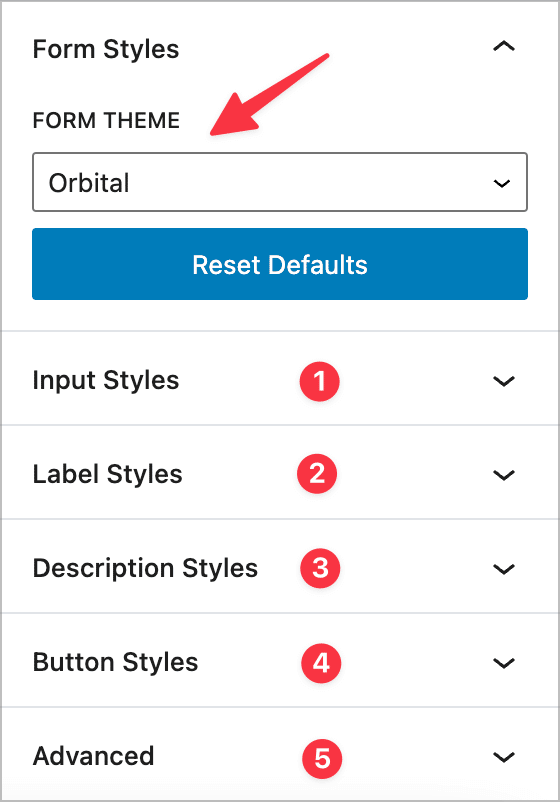
How to style forms in Gravity Forms
Gravity Forms allows you to style your forms from within the WordPress block editor! You can tweak the color scheme, change the size of field inputs, add custom button styles, and more—all without having to write a single line of CSS.
All you need to do is change the form theme from “Default” to “Orbital”. You can then adjust the input, label, description and button styles.
💡 Pro tip: You can gain additional control over a form’s style and layout beyond what the options in the Gravity Forms editor allow using CSS ready classes.
What happens after clicking “Submit”?
After constructing your form and embedding it on your website, users will be able to see it on the front end. When a user fills out your form and clicks “Submit”, their submission gets saved to your WordPress database. Clicking “Submit” also triggers your notifications and confirmations if you have any configured!).
To view form submission, hover over “Forms” and click on “Entries”. Now select a form from the dropdown menu in the top left. You will now see all the submissions for that form.
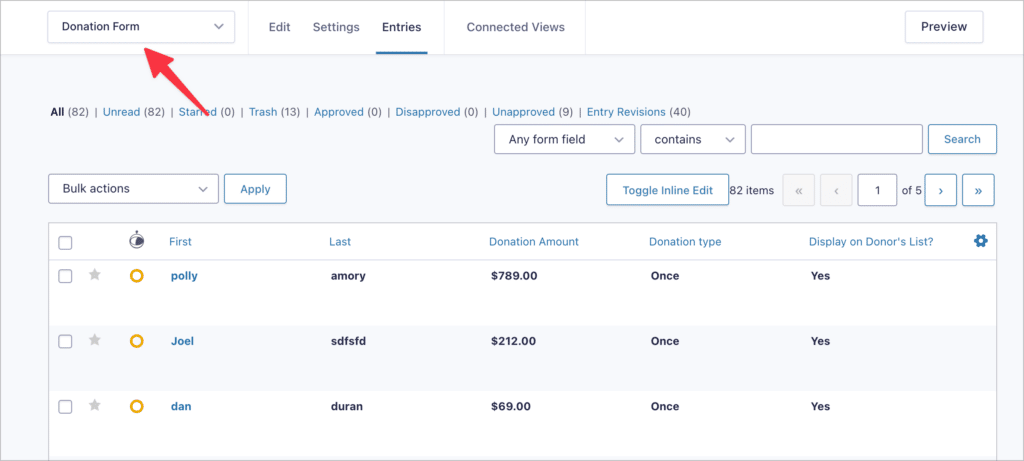
To view a particular submission in more detail, hover over it and click “View”.
Gravity Forms merge tags
Merge tags are one of the most important features of Gravity Forms. Merge tags allow you to dynamically load content from user inputs.
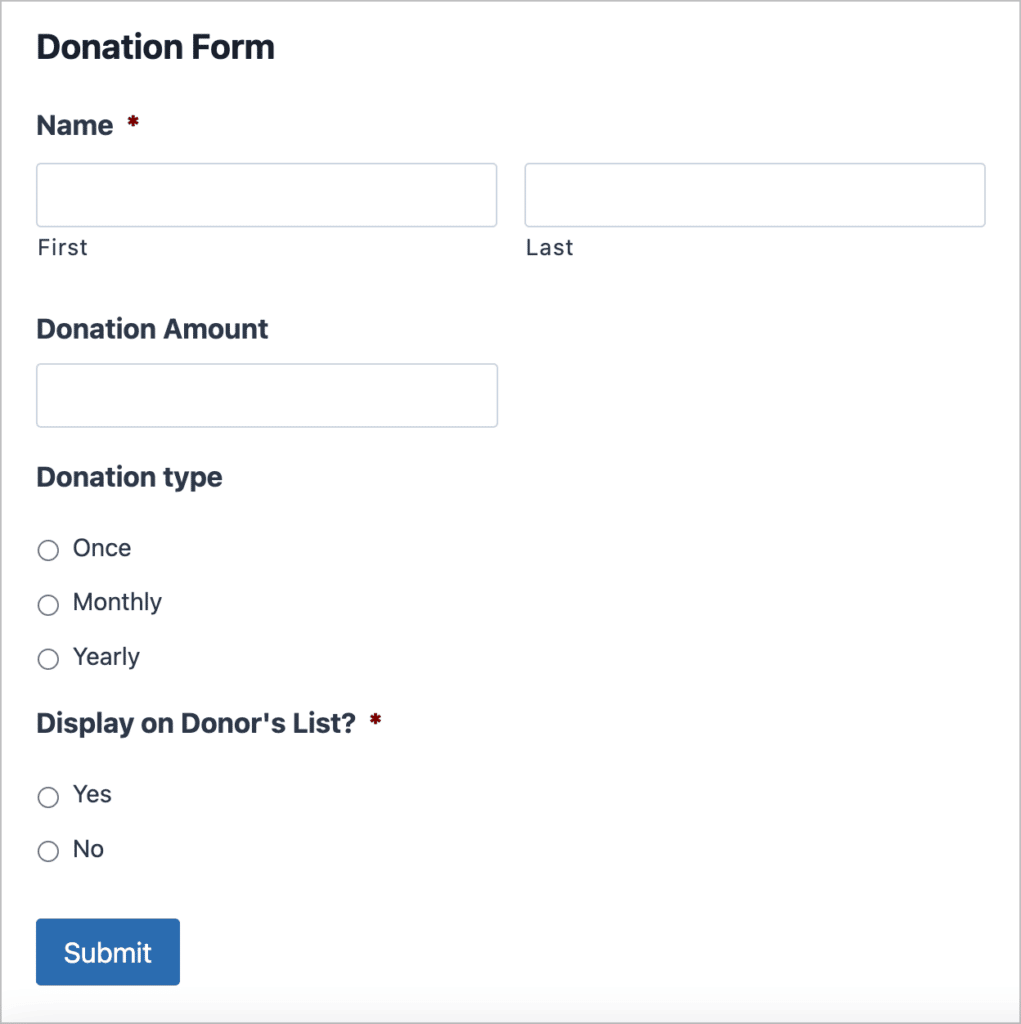
Selling products with Gravity Forms
Gravity Forms is so much more than a form plugin. In fact, Gravity Forms can act as a full eCommerce solution all on its own. No matter what business you’re in, you can use Gravity Forms to turn your WordPress site into an online store.
💡 Pro tip: Integrate Gravity Forms with WooCommerce to take an existing eCommerce store to the next level!
It’s important to note that payment processors are not available with the “Basic” plan. You’ll need either a “Pro” or “Elite” license to take payments on your site.
Gravity Forms supports the following payment add-ons:
- PayPal (Checkout, Standard and Payments Pro)
- Stripe
- 2Checkout
- Authorize.net
- Square
Once you’ve chosen a payment processor, it’s time to build your payment form.
💡 Pro tip: For a head start, download and import the eCommerce form template from the Gravity Forms template library.
The form fields that you add will depend on your business and the information you need to capture. Most payment forms include a Name, Email, Phone, and Address field.
Next, you’ll need to add pricing fields to calculate product costs, shipping fees, and process transactions.
You can find all product and payment-related fields under “Pricing Fields”.
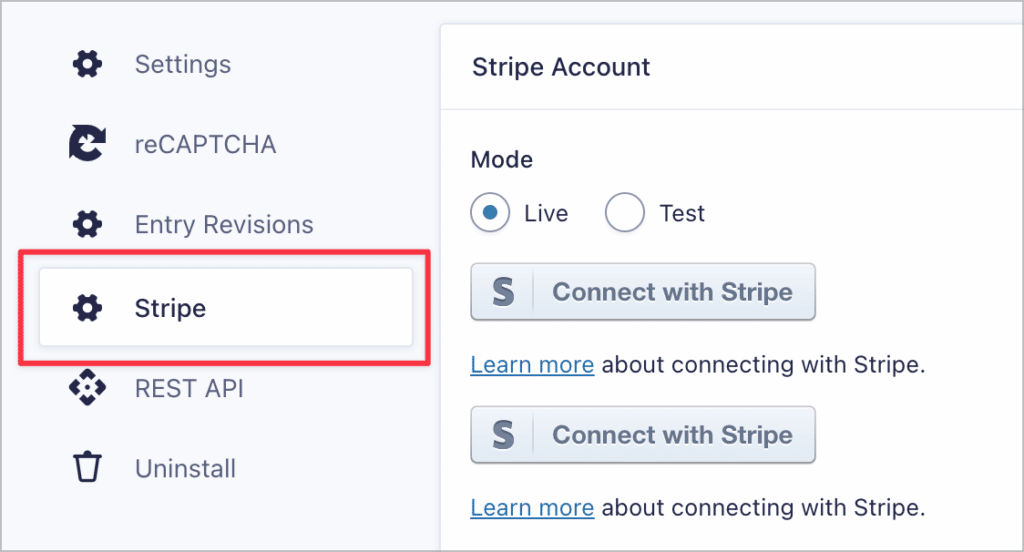
After adding your product fields and choosing a checkout method, the next step is to configure a new feed to connect your form with your payment processor.
For example, if you’re using Stripe, hover over Settings, click Stripe and enter your Stripe details.
All that’s left to do is embed your payment form on a page or post on your website so that users can buy your products/services. That’s it!
Registering new users on your website with Gravity Forms
To register new users through Gravity Forms, you’ll need the User Registration add-on. This add-on automatically creates a new user on your site when they submit your form.
The first thing you’ll need to do is create the registration form. For the User Registration add-on to work, you’ll need to include fields for the username and email address along with any other fields that you feel are necessary.
Next, you need to create a new User Registration feed to ensure your form can register new users.
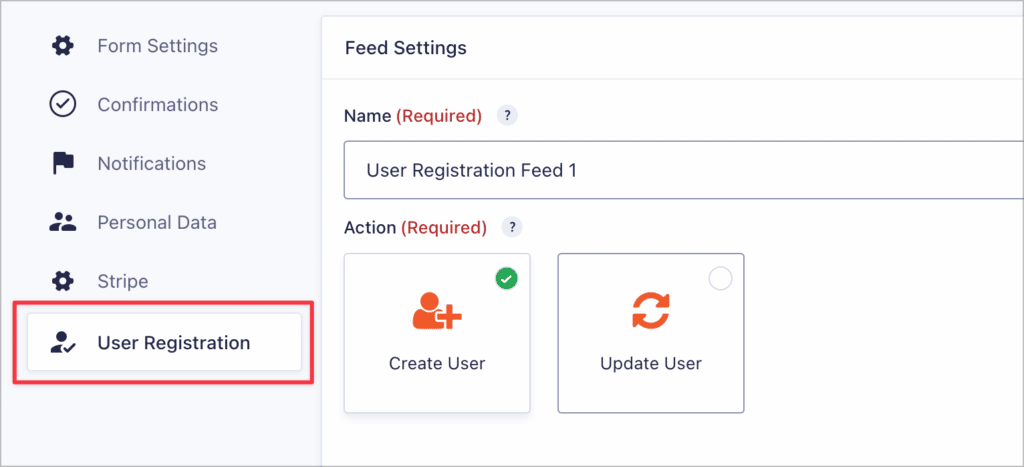
After configuring the User Registration feed, new users can register on your site by filling out your registration form.
If you want to charge people a fee for signing up, you can connect the User Registration add-on with the PayPal add-on to ensure new users are only registered after confirming payment.
Editing and updating your forms and entries
After creating new forms, you can always go back and update them if need be. To edit an existing form, head over to the “Forms” page, hover over your form, and click “Edit”. This will take you to the visual form editor where you can add/delete fields, modify field settings, update field labels, and more.
You can also update form entries. Here are some helpful guides showing you how to do this:
- How to update an existing entry in Gravity Forms
- How to bulk update entries in Gravity Forms
- How to bulk correct errors in Gravity Forms submissions
How does Gravity Forms stack up against other form builders?
- Contact Form 7 vs Gravity Forms: which is the better form builder?
- Gravity Forms vs Ninja Forms: the best form builder in 2023
- Are you looking for the best Gravity Forms alternative? You may be surprised…
- Why Gravity Forms is the best Typeform alternative
What are the best add-ons and extensions for Gravity Forms?
- The best Gravity Forms add-ons in 2023
- 5 Amazing Gravity Forms add-ons you’ve never heard about
- 8 Examples of essential Gravity Forms add-ons and extensions
More helpful guides
Here are some additional guides for learning more about the Gravity Forms plugin:
- Exporting data from Gravity Forms: the ultimate guide
- Importing entries to Gravity Forms: the ultimate guide
- Displaying Gravity Forms entries: the ultimate guide
- Gravity Forms calculations: the ultimate guide
- Gravity Forms conditional logic: the ultimate guide
- How to display Gravity Forms field values
Getting started with Gravity Forms: final thoughts
Gravity Forms is the most powerful and reliable form plugin for WordPress.
Gravity Forms is a leader in website accessibility, allowing you to build forms that are SEO optimized and WCAG compliant using an intuitive drag and drop interface.
The power of Gravity Forms lies in its extensibility and flexibility. There is a range of add-ons available for Gravity Forms, allowing you to integrate it with other popular applications.
There are also seven Gravity Forms certified developers that offer a variety of robust extensions for Gravity Forms allowing you to display submission data on the front end, export customized PDFs, create automated workflows, and much more.