
Did you know that data analytics can make decision-making 5x faster for businesses?
Having access to your business data is important for several reasons. Data often conceals valuable insights that could help streamline your business processes and elevate your bottom line.
Gravity Forms may be the most powerful form plugin for WordPress, but it’s limited when it comes to reporting and data analysis.
In this post, we’ll show you how to create custom Gravity Forms entry reports using GravityExport 🗄️⬇️
Why you need a reporting system for Gravity Forms
Gravity Forms is a versatile form plugin that allows you to collect a lot of different types of data. Small and large businesses use Gravity Forms for a range of use-cases, from collecting contact requests to recording customer information.
By default, Gravity Forms does allow you to export data. However, the built-in export functionality is severely limited. For example, you can only export entries to CSV and there are very few options available for customizing your reports.
That’s why most businesses need a more configurable and robust reporting plugin!
Here are some examples of how you might use data reporting in Gravity Forms:
- Sales reports
- Customer details reports for importing into a CRM
- Backing up important data
- Exporting data for analysis in Excel or Tableau
- Business Intelligence reporting
Here’s why GravityExport is the best Gravity Forms reporting plugin 👇
Why is GravityExport the best Gravity Forms reporting plugin?
GravityExport is an add-on for Gravity Forms that allows you to export form data using a secure, shareable download link. You can also create multiple reports, with different filters and send files to remote storage locations.
Exporting reports is as simple as pasting the download URL into your browser. This allows anybody to access the data, even if they aren’t logged into the site.
Here’s why GravityExport is the best Gravity Forms reporting plugin:
- Export entries in different formats
GravityExport allows you to export your form entries to different file formats including CSV, Excel and PDF.
- Safe and secure exports
Each report you create is associated with a unique and secure download URL. You can limit downloads to logged-in users only, or allow anyone to download.
- Share data easily
There’s no need to create an Admin account for users who need access to your reports. Simply send the download link to whoever needs the data.
- Remote storage
GravityExport supports remote storage, allowing you to send reports to Dropbox, FTP or a local folder on your server.
- Advanced conditional logic
Using advanced conditional logic settings, you can apply filters to your data to build custom reports.

GravityExport for Gravity Forms reporting
There are other plugins available for exporting data from Gravity Forms. However, most of them are limited in terms of features and functionality. GravityExport, on the other hand, is a well-rounded solution that allows you to replace multiple plugins with a single, all-in-one solution.
How it works
You’ll need to start by installing both GravityExport Lite (the free version of the plugin) and GravityExport. After that, you’ll need to activate the Download URL and configure the settings on your first report. If you want to set up multiple reports, you can create a new Filter Set. If you want to send data to remote storage, you’ll need to create a new Save feed.
What kind of reports can I create?
GravityExport allows you to export data to CSV, Excel and PDF. You can also create multiple reports, with different filters, that export to different file types!
Here’s an example. Let’s say you’re collecting sales data. You could configure two reports – one CSV report that you can analyze in Excel and another PDF report for record keeping.
Where can I send my Gravity Forms reports?
Creating a new Save feed allows you to configure a report that automatically saves to a remote or local storage location.
- Dropbox – Save data to a folder in your Dropbox.
- SFTP – Send reports to an external server using SFTP.
- Local storage – Save reports to a folder on your local server.
Now let’s look at how to generate reports using the GravityExport plugin.
How to generate reports for Gravity Forms using GravityExport
Here’s what you’ll need to start generating Gravity Forms reports using GravityExport.
- Gravity Forms
- GravityExport Lite (free plugin on WordPress.org)
- GravityExport (optional, provides several extra features)
Activate the download URL
Start off by going to the “Forms” page in Gravity Forms. Next, hover over your form and click on the “Settings” link. You’ll see three “GravityExport” tabs on the left. Select the “GravityExport” tab and click the button that says “Enable download URL”.

After enabling the download, you’ll see the unique download URL appear. Now you can configure the report, create filters and set up automatic exports.
Configure the report settings
Now you can modify the report settings. Here you’ll find a range of options for customizing your report. You can:
- Change the download permissions
- Choose which fields to include
- Include entry notes
- Change the entry order
- Set the column position
- Set a custom filename
- Choose the file type
- Enable multi-row splitting
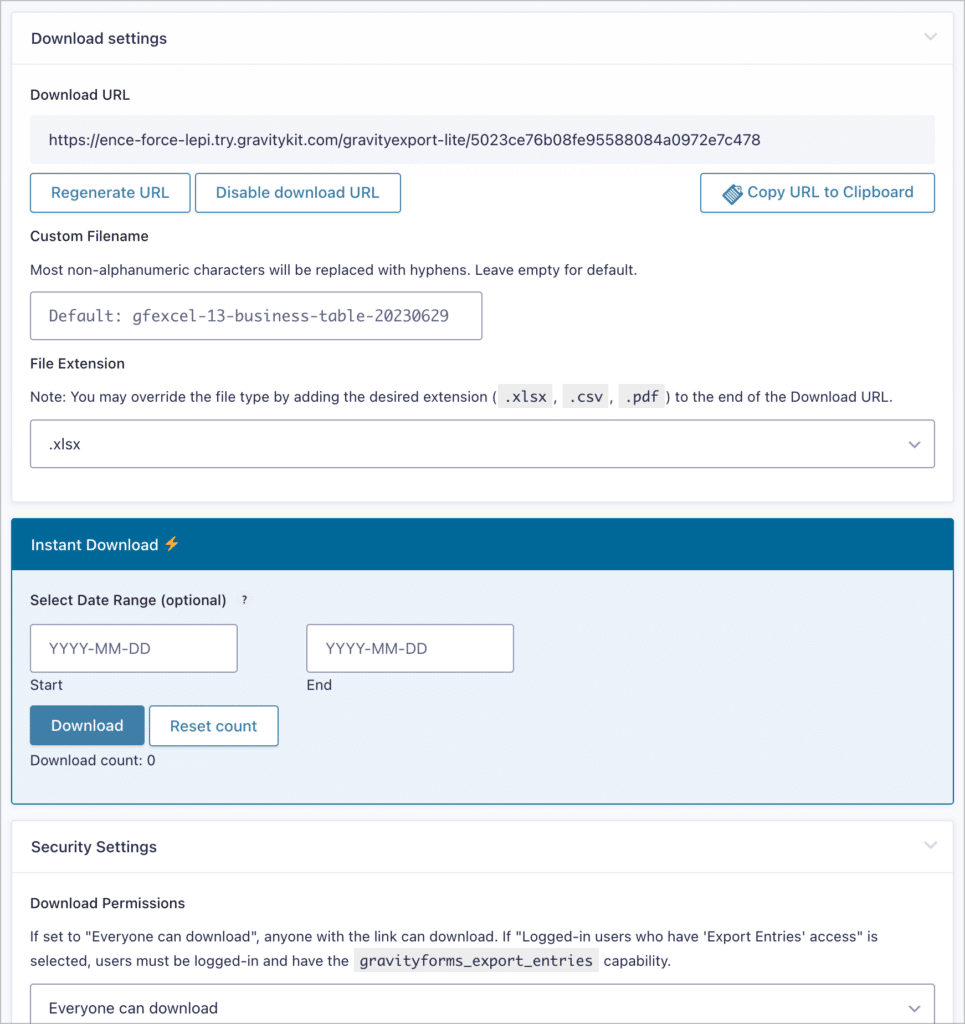
…And more!
Create multiple reports with different settings
The “GravityExport Filters” feed allows you to configure multiple reports with different fields, conditional logic settings, and file extensions.
This allows you to create multiple reports for different purposes.
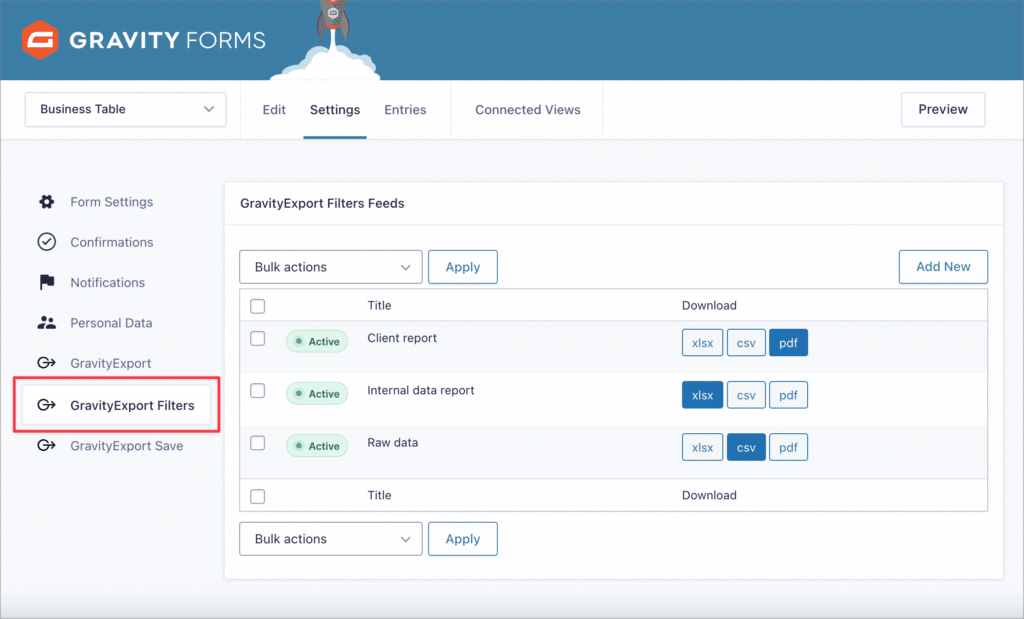
As you can see in the above screenshot, we’ve set up three separate reports—a “Client report” that exports to PDF, an “Internal data report” that saves form data to an Excel file, and another “Raw data” reports that dumps all of our form data into a CSV file.
💡 Pro tip: Learn more about exporting Gravity Forms data to PDF documents.
Sending reports to remote storage locations
The “GravityExport Save” feed allows you to automatically send reports to remote or local storage.
To create a new remote export, select the “GravityExport Save” tab and click “Add New”. Now you can give your report a name, select a file type and choose whether you want to export all entries or only single entries.
Finally, you’ll need to choose a storage location (Dropbox, SFTP or Local storage).
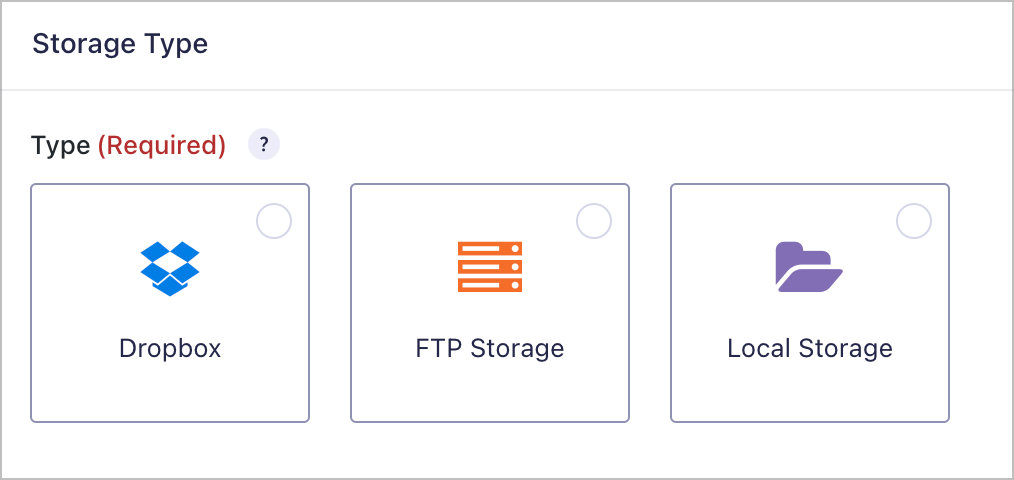
You can also add filters using conditional logic! This allows you to set up rules to extract the data you need. That’s it!
Custom Gravity Forms reporting with GravityExport
Effective data reporting allows you to collect, analyze, present, and share data to uncover actionable insights that improve your business operations.
The Gravity Forms built-in export functionality only allows you to export data to a CSV file and there are limited filtering options available.
In this post, we showed you how to create sophisticated reports in Gravity Forms, configure conditional logic filters and save your data to a remote storage location using the GravityExport plugin.
If you found this post helpful, check out more content on our blog!

Helpful tips right in your inbox.
Subscribe to our biweekly newsletter for tips, special offers, and more!
Helpful tips right in your inbox.
Subscribe to our biweekly newsletter for tips, special offers, and more!