🚀
All the different ways to edit Gravity Forms entries. Edit entries inline, restore prior versions and modify entries on the front end.
Estimated reading time: 6 minutes
Gravity Forms is the most trusted and robust form plugin for WordPress. Thousands of businesses and millions of websites use Gravity Forms to collect and process important information.
But how do you edit that information after you’ve captured it?
That’s what we’re going to cover in this article.
You can edit form entries inside the WordPress Dashboard using Gravity Forms itself (the slow way) or you can use the GravityEdit plugin to speed up the process. And if you want to track changes made to form entries and restore prior versions, you can do that with the GravityRevisions add-on.
We’ll also look at how to edit Gravity Forms entries on the frontend using GravityView and finally, we’ll show you how to restrict editing to certain user roles.
Are you ready? Let’s go!
Table of contents
- Advantages of editing Gravity Forms entries
- Edit Gravity Forms entries faster using GravityEdit
- Track entry revisions in Gravity Forms and restore prior versions
- Editing Gravity Forms entries on the front-end
- Bulk editing Gravity Forms submissions
- Restricting the ability to edit entries in Gravity Forms
- Edit Gravity Forms entries: final thoughts
Advantages of editing Gravity Forms entries
Having the ability to edit Gravity Forms entries allows you to fix errors and keep your form data consistent.
Depending on your business, you may need to edit Gravity Forms entries for different reasons. For example, if you use Gravity Forms to collect product orders, you may need to mark the order as complete once it’s been shipped.
And if you use Gravity Forms to track issues for your software platform, then you may need to update the status on certain issues.
When administrators and users edit entries, Gravity Forms becomes a full application, not just a form plugin. The data becomes dynamic.
Businesses often spend hours every week updating entries in Gravity Forms. It’s a boring (but important) task.
Without entry editing, user-submitted data is final—the end! When administrators and users edit entries, Gravity Forms becomes a full application, not just a form plugin. The data becomes dynamic.
Editing entries in Gravity Forms using built-in editing
Gravity Forms’ built-in editing is slow, inefficient, and limited to administrators only. On top of that, when changing a field’s value, there’s no validation, meaning any input will be valid! Here is when you should and shouldn’t use Gravity Forms’ built-in entry editing.
When to use Gravity Forms’ built-in editing: If you only need to edit a couple of entries every now and then, Gravity Forms’ built-in editing is good enough.
When not to use Gravity Forms’ built-in editing: If you regularly edit existing form entries and want to save time by using a faster method.
Edit Gravity Forms entries faster using GravityEdit
The best and easiest way to edit existing entries in Gravity Forms is by using the GravityEdit add-on (it’s 340% faster than regular editing!).
If you need to edit entries en masse, this is by far the quickest way to do it. Using GravityEdit, you can update entries without having to click “Edit” on each one.
- Updating existing entries in Gravity Forms using GravityEdit
- How to quickly update File Upload fields with inline editing
Track entry revisions in Gravity Forms and restore prior versions
So now you know how to edit Gravity Forms entries, but what about tracking revisions and restoring prior versions of an entry?
This is possible using the GravityRevisions add-on. This plugin keeps track of all the changes made to an entry and allows you to restore prior versions with the click of a button.
Depending on how you use Gravity Forms, GravityRevisions can help you: track the status of product orders, see changes to user details over time (for CRM use-cases), track changes made by members on your site, ensure you don’t accidentally lose important data, and more!
- Track changes made to Gravity Forms entries using GravityRevisions
- How to configure email notifications for entry updates
- How to display entry revisions on the front end using GravityView
Editing Gravity Forms entries on the front-end
To edit entries in Gravity Forms, you usually need to log in with administrator rights, navigate to the entry you want to update, and manually edit the field values.
This can be time-consuming, especially if you’re collecting data that requires frequent updates! A better solution is to allow users to update entries themselves from the front end. This frees up your time to focus on other tasks and keeps your website secure by never revealing the backend to your users.
Whether you’re using Gravity Forms to capture data for job applications, user profiles, or company registrations, front end editing is a powerful feature that adds flexibility and security to your website.
- Gravity Forms front end editing: edit entries after clicking “Submit”
- How to create and edit user profiles in Gravity Forms using GravityView
- Updating existing Gravity Forms entries on front end using GravityEdit
Bulk editing Gravity Forms submissions
Updating entries in Gravity Forms can be a time-consuming process, especially if you’ve got hundreds of entries that need editing! Bulk editing your entries allows you to save precious time and streamline your workflow.
- Bulk updating Gravity Forms entries using GravityActions
- Bulk updating Gravity Forms entries using Import Entries
Restricting the ability to edit entries in Gravity Forms
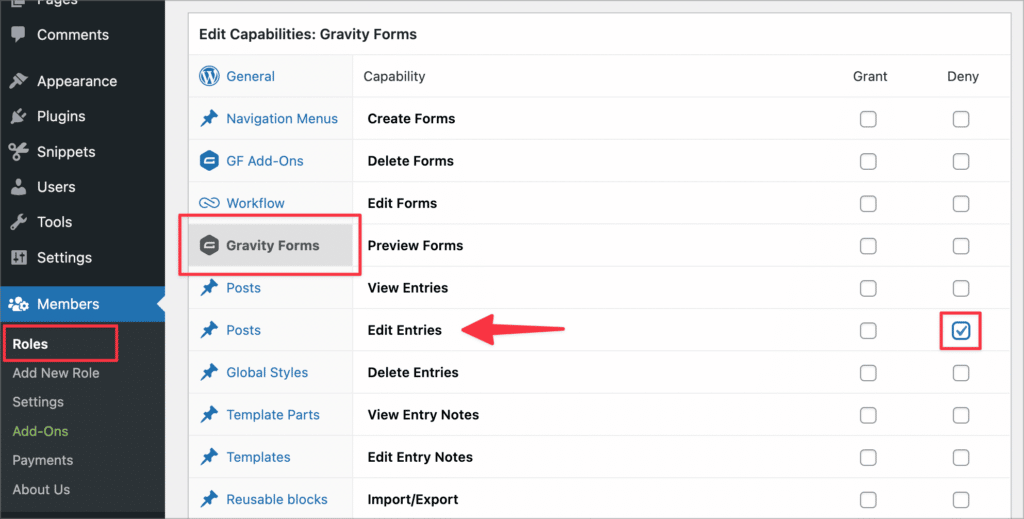
If you want to restrict the edit entry capability for certain user roles, you can do this using the free Members plugin by Memberpress.
First, hover over “Plugins” and click on “Add New”. Search for “Members” and scroll down until you find the “Members – Membership & User Role Editor Plugin”. Install and activate the plugin.

After activating Members, you’ll see a new menu item called “Members”. Hover over it and click on “Roles”.
Now hover over a role, click “Edit”, and then click on the tab that says “Gravity Forms”. Next, scroll down until you see the “Edit Entries” capability and check the box that says “Deny”.
Edit Gravity Forms entries: final thoughts
In this guide, we covered all the ways to edit your form entries in Gravity Forms.
The GravityEdit plugin by GravityView allows you to edit Gravity Forms entries 340% faster. If you’re working with hundreds or thousands of form entries that need altering, you can use GravityActions to bulk update entries and change multiple field values at the same time.
Finally, if you need to keep track of all changes made to an entry and restore prior versions, you can use our GravityRevisions plugin.